Budget-Friendly D.I.Y Storage Ideas For Your Home

A clean and tidy home is what many of us aim for. But, unfortunately, maintaining a tidy home in the long run can easily become a hassle. With so many people in and out and so much stuff without a home, a lack of storage can easily start to show around a house. And, with prices hiking amid the cost of living crisis, prioritising organising your home can fall to the bottom of the list. Unfortunately, the cost of living crisis is affecting households severely around the UK. But, you don’t have to continue pushing through mounds of clutter in your home - we have plenty of easy, budget-friendly D.I.Y storage ideas for every room of your home that are on trend for 2023!
How Is The Cost of Living Crisis Affecting Households In The UK?
The cost of living crisis is affecting us all, but have you stopped to wonder just how much your lifestyle has changed since the increase of costs across the board? Several reports have explored the effects of the cost of living crisis on households across the UK, and the results are higher than many of us would expect.
As you can see, the cost of living crisis has unfortunately hit us all rather hard. With many of us reducing our spending or completely changing our spending habits, finding helpful, cost-effective tips to help with our daily lives can be so beneficial. Whether this be food shopping hacks or handy storage solutions to keep the house clean and tidy, all of us can benefit from cheap, easy solutions.

Inexpensive D.I.Y Storage Projects To Clean Up Your Home For Less
Our varied range of D.I.Y storage solutions has something for everyone. From D.I.Y desks with an abundance of storage space to homemade bookcases for your or your children’s bedrooms, each of our D.I.Y storage ideas are simple to do, provide a stylish finish and won’t leave a dent in your wallet. Take a look through our D.I.Y guides to find ideal ways to keep your home clean for less.
1. Storage Coffee Table
Keep all your magazines, books and spare cushions out of sight with this charming storage coffee table. With only two steps and a bit of hard work, you can put a few wooden crates and a moveable plywood slab to good use in your front room.
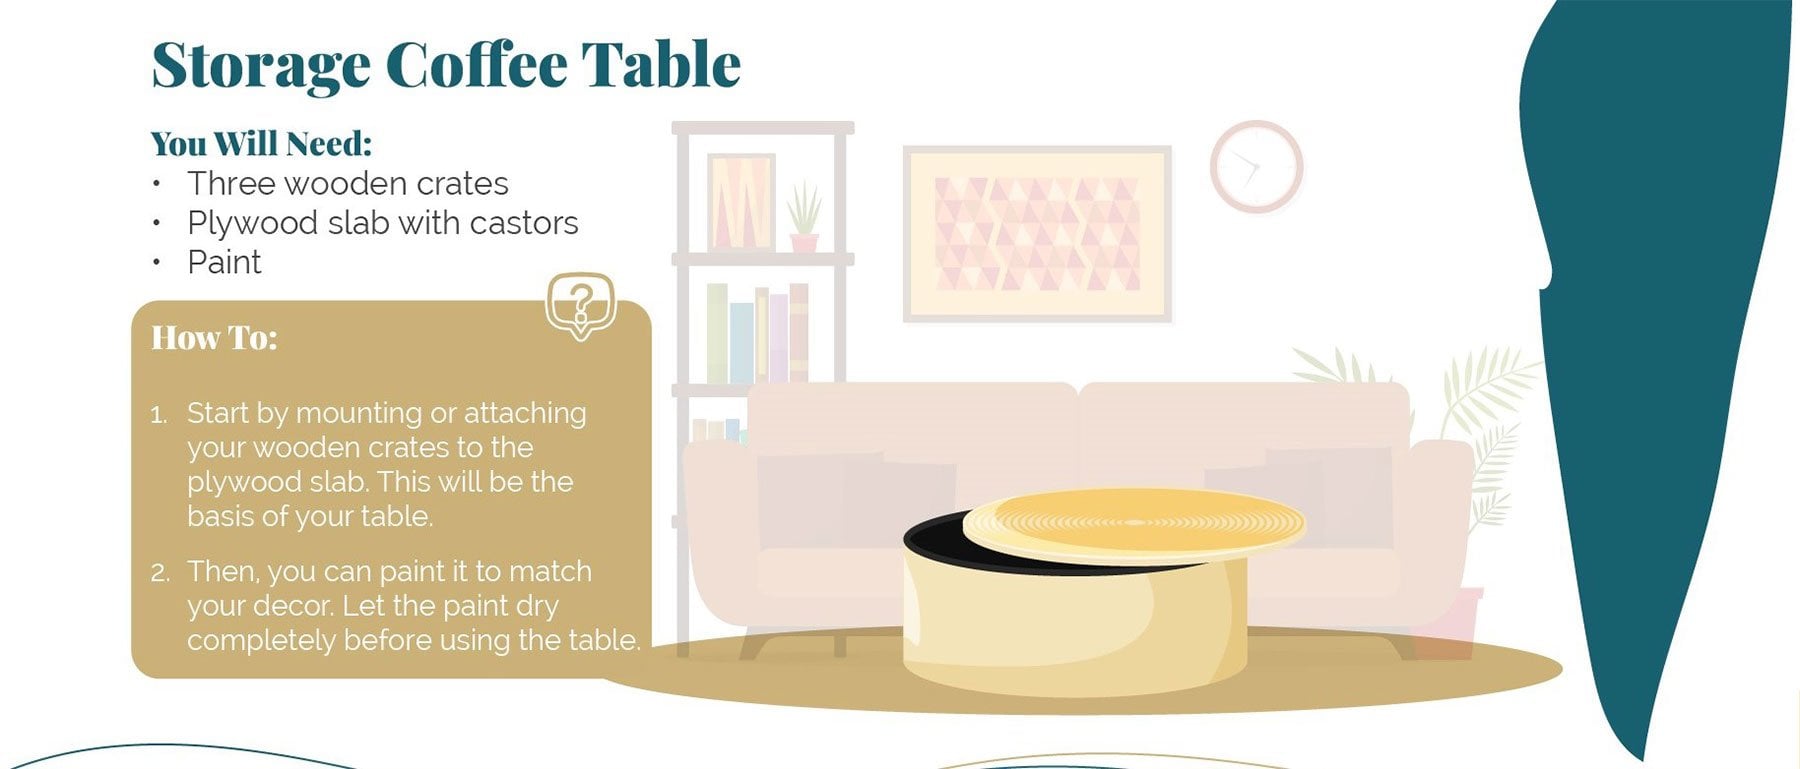
| You Will Need: | How To: |
|
• Three wooden crates • Plywood slab with castors • Paint |
1. Start by mounting or attaching your wooden crates to the plywood slab. This will be the basis of your table. 2. Then, you can paint it to match your décor. Let the paint dry completely before using the table. |
View our range of coffee side tables for a quick, inexpensive solution
2. Ladder Shelves
Repurpose an old ladder for next to nothing with these handy ladder shelves. This sweet D.I.Y project provides a handy storage solution in a classic vintage fashion and gives you the opportunity to display all your trinkets in style.
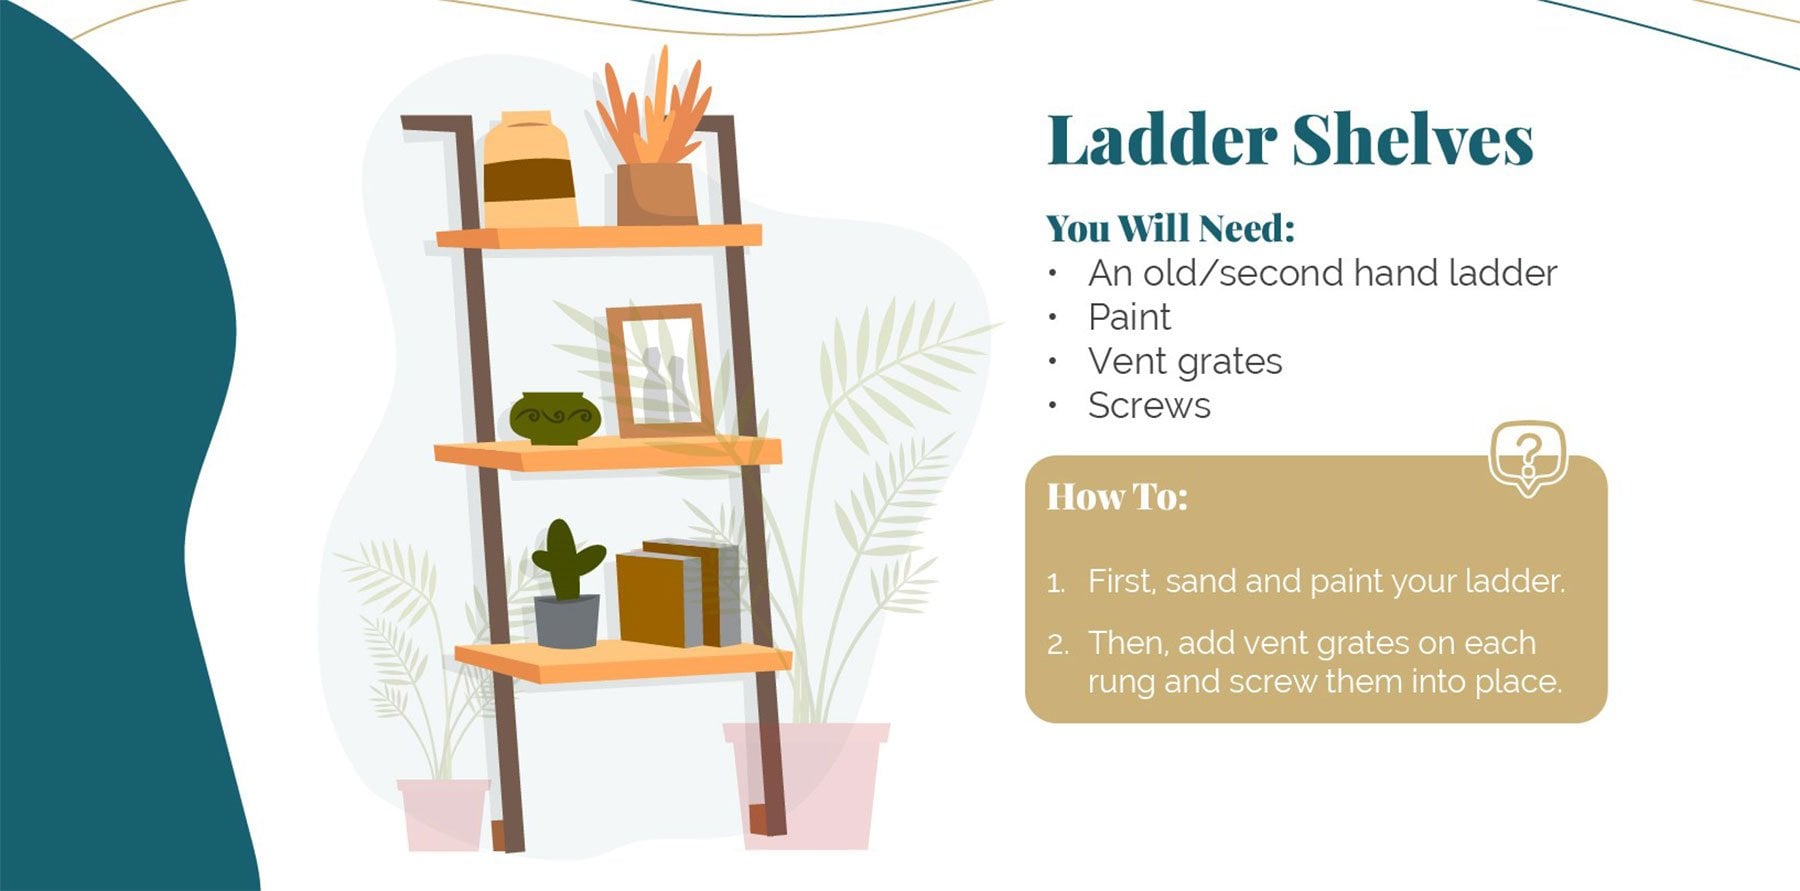
| You Will Need: | How To: |
|
• An old/second hand ladder • Paint • Vent grates |
1. First, sand and paint your ladder. 2. Then, add vent grates on each rung and screw them into place. 3. Finally, situate the ladder by leaning it almost completely against the wall to avoid a trip hazard. |
3. Basket Bedside Storage
A bedside table is vital storage - from books to phone chargers, lamps to tissues, a bedside table is the best place to keep all your bedtime essentials at hand. This handy basket-cum-bedside storage is a quick and stylish solution that will fit seamlessly with any decor style. Have a look at our contemporary storage baskets to get started!

| You Will Need | How To: |
|
• A large woven basket • Small pieces of wood cut to fit inside the woven basket • Screws |
1. Start by turning your woven basket on its side. Then, mount the small pieces of wood inside the basket to create shelves. 2. Then, mount the basket on a wall by your bed or place it on the floor by your bed for a bedside table. |
4. D.I.Y Jewellery Organiser
Banish tangled chains and lost rings with this beautiful D.I.Y jewellery organiser. Easily put together with nothing but a picture frame and enough mounted hooks or decorative knobs to keep all your jewellery safe and accounted for, you could also use this organiser to keep bobbles, bags, or other small collections of belonging together in style.
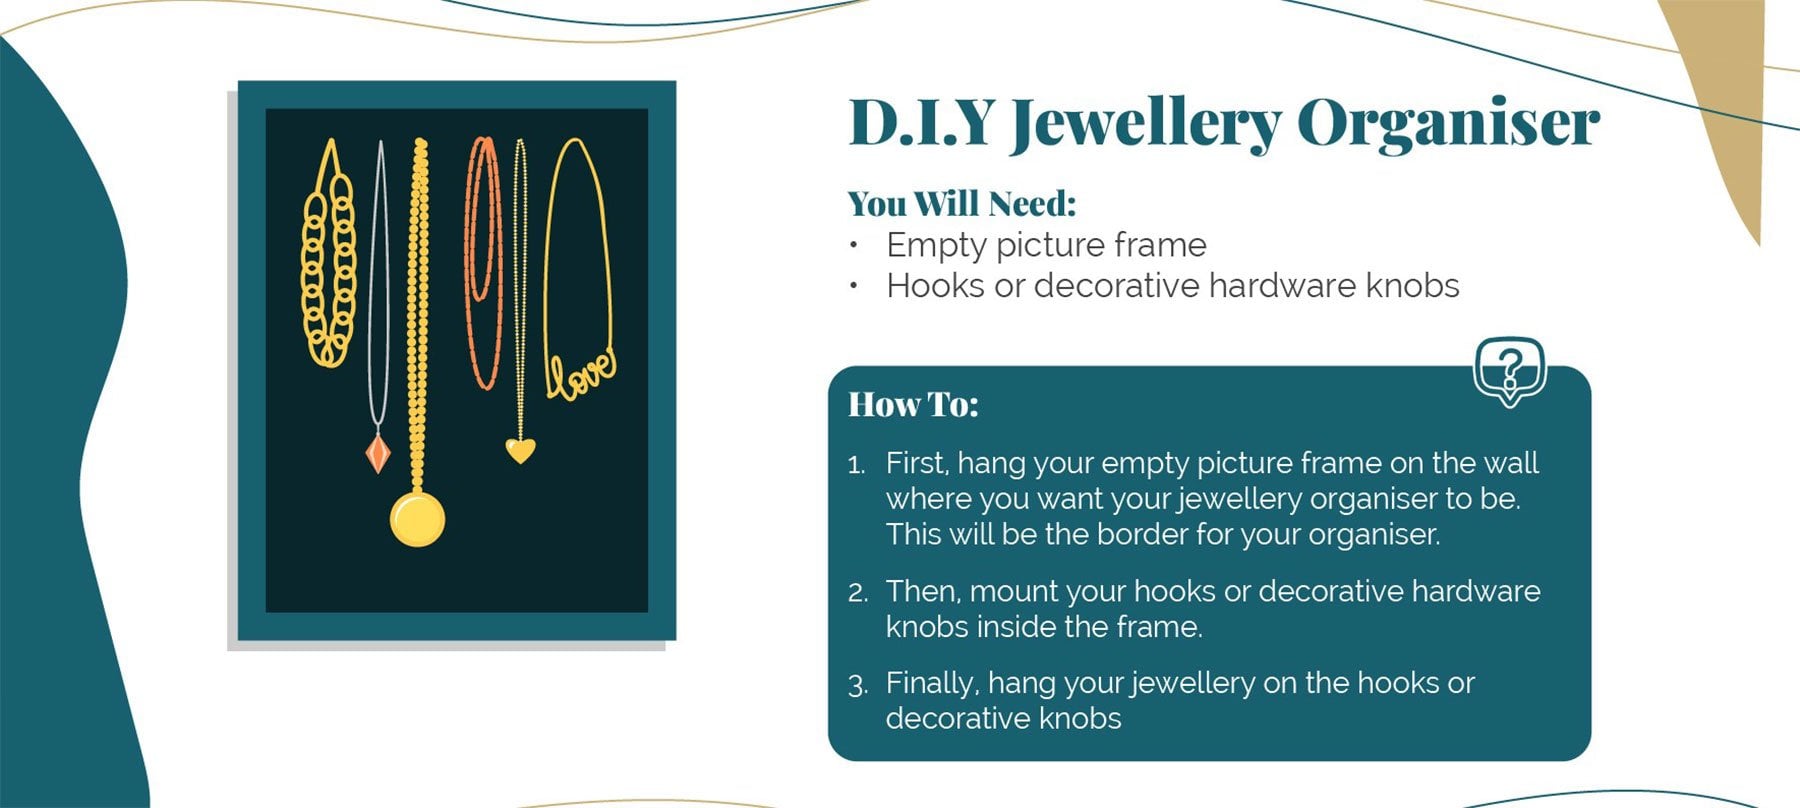
| You Will Need: | How To: |
|
• Empty picture frame • Hooks or decorative hardware knobs • Screws |
1. First, hang your empty picture frame on the wall where you want your jewellery organiser to be. This will be the border for your organiser. 2. Then, mount your hooks or decorative hardware knobs inside the frame. 3. Finally, hang your jewellery on the hooks or decorative knobs. |
5. Cardboard Drawer Dividers
Messy drawers can quickly become the bane of your life, but you don’t have to worry about that with these simple cardboard drawer dividers. With some stylish wrapping paper and a bit of craftiness, you can create perfect sections for all your clothes and instantly declutter those pesky drawers.

| You Will Need | How To: |
|
• Cardboard • Wrapping paper • Double-sided tape • Craft knife or scissors • Sticky tape • Measuring tape • Ruler |
1. First, measure the height and width of your drawer along where you want your cardboard dividers to fit. 2. Then, mark out the lines and size of your dividers on the cardboard and cut them to size. Make sure to check the size in the drawer before you move on to the next step and make any necessary adjustments. 3. Measure your wrapping paper so it’s large enough to cover both sides of your divider and adhere the pieces of cardboard to paper using double-sided tape. 4. Finally, insert dividers into your drawer in the positions you want them. Add extra reinforcement with wide sticky tape if needed at the ends of the drawer. This will help prevent them from moving. |
6. D.I.Y. Bookshelves
A more ambitious project are these D.I.Y bookshelves, which require a bit of patience and planning to ensure the result is usable. Plus, you will have to give yourself plenty of time to decorate the bookshelves with wrapping paper, which can be time-consuming depending on the size and shape of your shelves. The finished project is perfect for your child’s bedroom or a nursery but would fit beautifully in a bedroom if you are prepared to take on a large project.
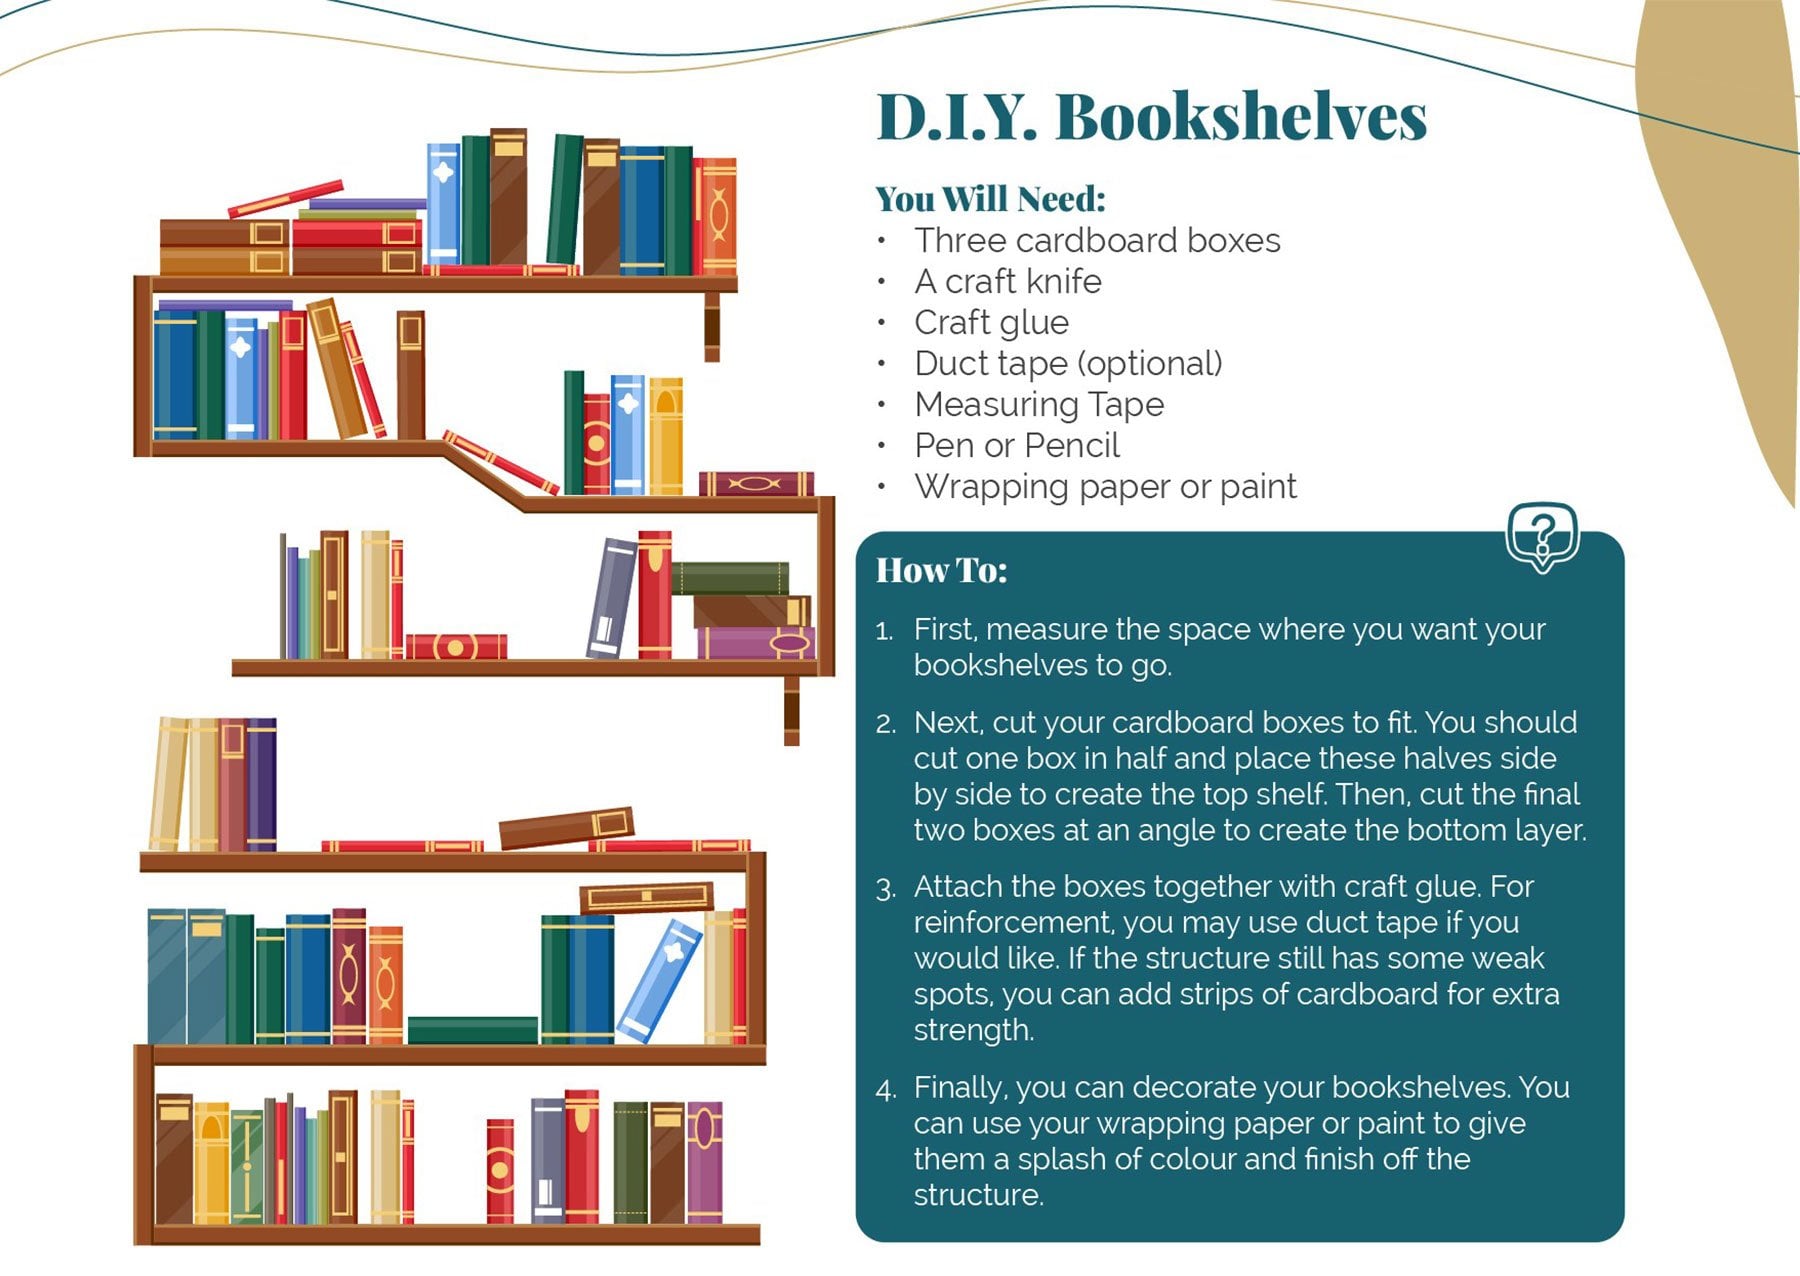
| You Will Need: | How To: |
|
• Three cardboard boxes • A craft knife • Craft glue • Duct tape (optional) • Measuring Tape • Pen or Pencil • Wrapping paper or paint |
1. First, measure the space where you want your bookshelves to go. 2. Next, cut your cardboard boxes to fit. You should cut one box in half and place these halves side by side to create the top shelf. Then, cut the final two boxes at an angle to create the bottom layer. 3. Attach the boxes together with craft glue. For reinforcement, you may use duct tape if you would like. If the structure still has some weak spots, you can add strips of cardboard for extra strength. 4. Finally, you can decorate your bookshelves. You can use your wrapping paper or paint to give them a splash of colour and finish off the structure. |
Office
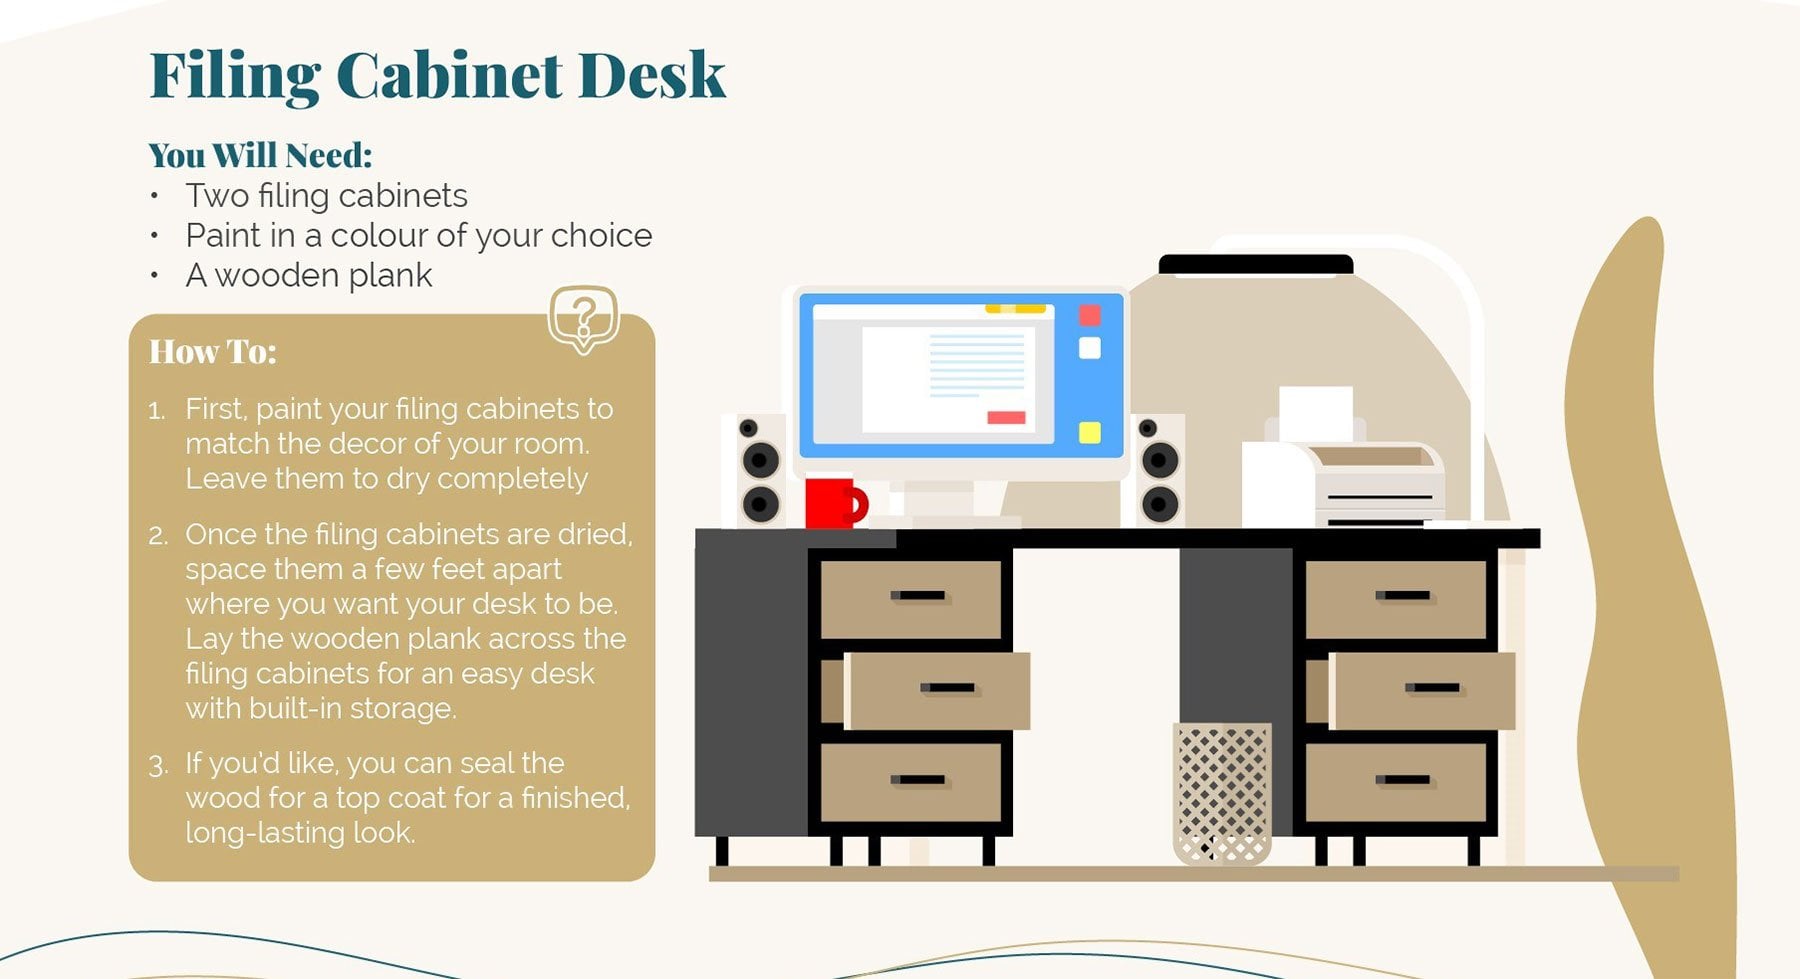
7. Filing Cabinet Desk
A desk is a vital aspect to almost any work area, but a full desk can be a large investment. Fortunately, if you need the perfect space to work from home, this D.I.Y filing cabinet desk is easy to put together and gives you plenty of storage space.
| You Will Need: | How To: |
|
• Two filing cabinets • Paint in a colour of your choice • A wooden plank |
1. First, paint your filing cabinets to match the décor of your room. Leave them to dry completely 2. Once the filing cabinets are dried, space them a few feet apart where you want your desk to be. Lay the wooden plank across the filing cabinets for an easy desk with built-in storage. 3. If you’d like, you can seal the wood for a top coat for a finished, long-lasting look. |
8. Craft Supplies Storage
Artists and parents of young children will know that having craft supplies - paints, brushes, pencils, etc. - left out and about can become a cluttered mess in the blink of an eye. Well, you can keep those supplies in check with this neat toolbox storage. With a few Mason jars and a lick of paint, that old box can become a stylish storage solution in no time.

| You Will Need: | How To: |
|
• An old/second hand cleaning caddy or a toolbox • Paint in your favourite colour • Mason jars |
1. First, paint cleaning caddy or toolbox with your favourite colour. Leave it to dry completely. 2. Once dry, fill your new storage solution with mason jars to provide places to safely store your craft or work supplies. |
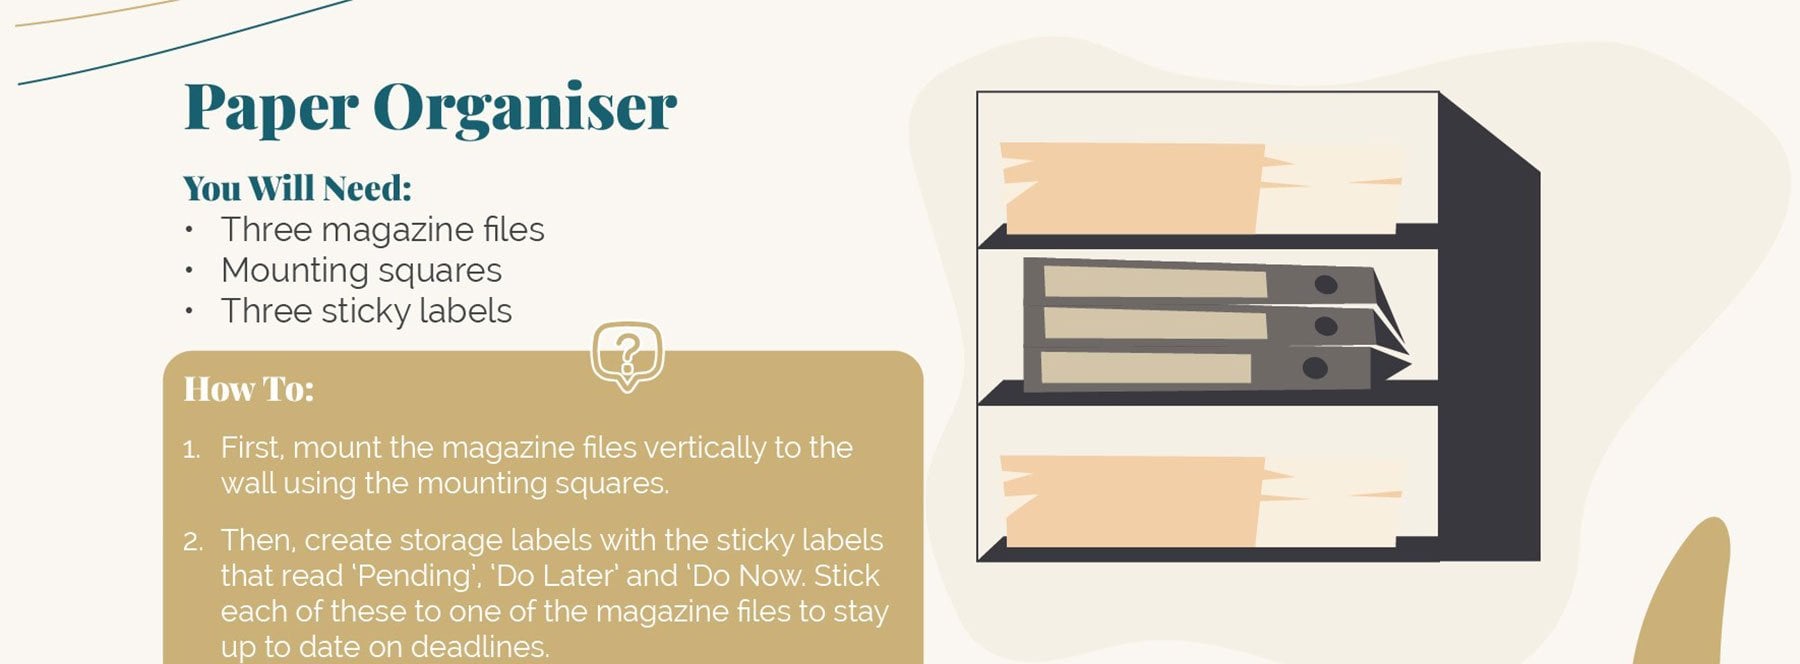
9. Paper Organiser
Keep all those papers in check in your office with this neat wall paper organiser. You can repurpose unused magazine files, buy new ones or think outside of the box to find your own solution for this simple D.I.Y activity that will certainly help alleviate stress as you work.
| You Will Need: | How To: |
|
• Three magazine files • Mounting squares • Three sticky labels |
1. First, mount the magazine files vertically to the wall using the mounting squares. 2. Then, create storage labels with the sticky labels that read ‘Pending’, ‘Do Later’ and ‘Do Now. Stick each of these to one of the magazine files to stay up to date on deadlines. |
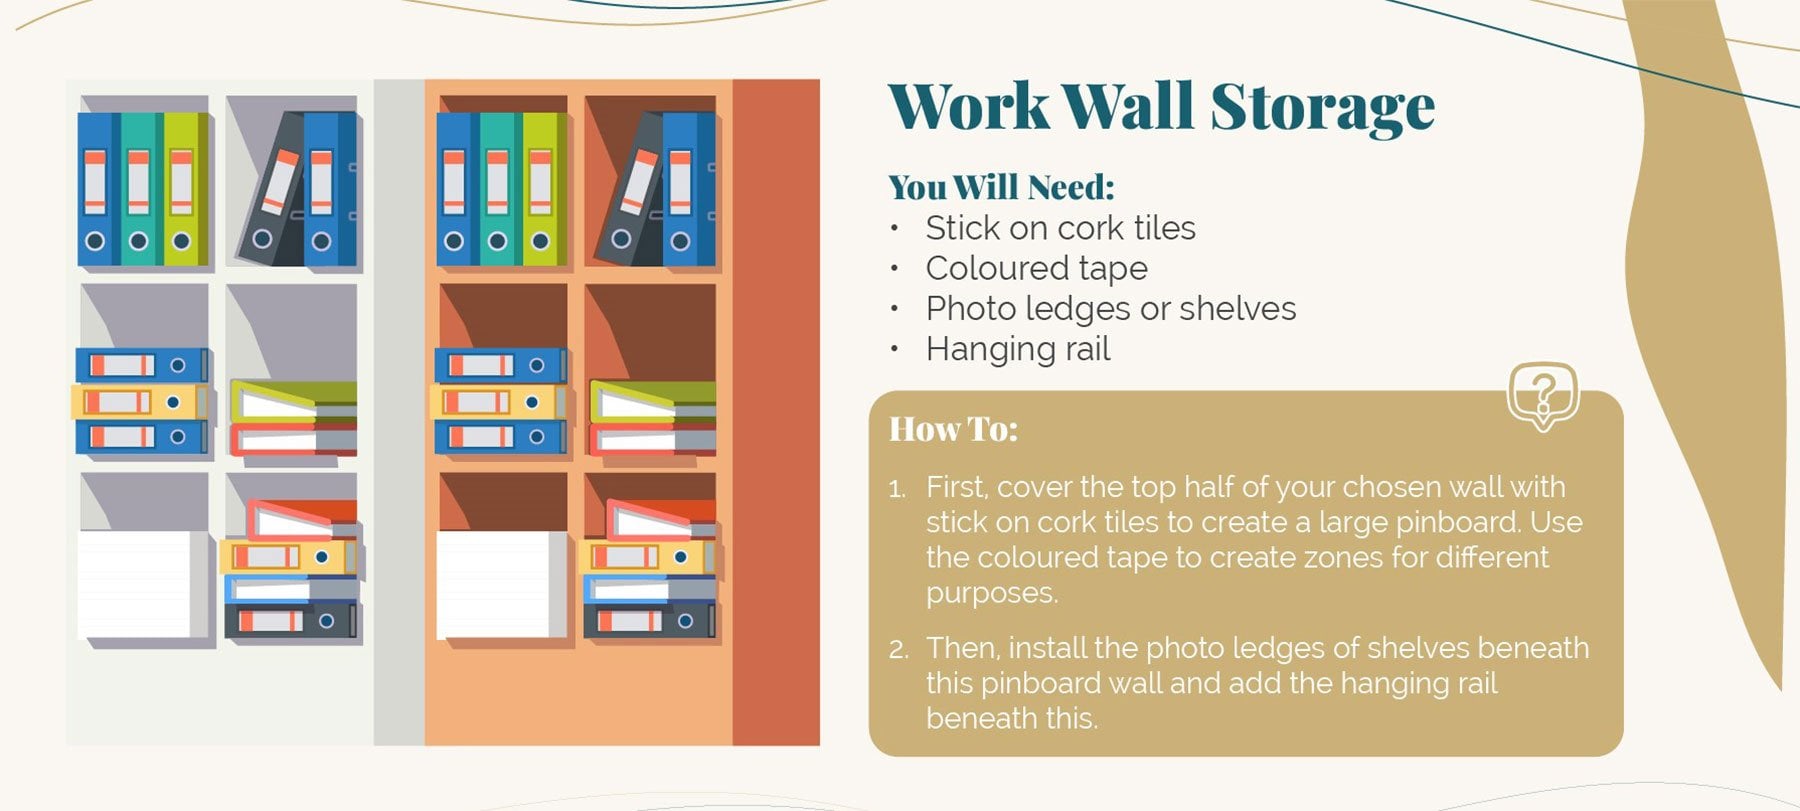
10. Work Wall Storage
If a paper organiser isn’t enough for you, this whole wall of work storage may tick off all your needs instead. With a pinboard to keep everything in order, shelves for important bits and an industrial hanging rail for important meeting clothes, this work wall storage project is easy to use and even easier to put up.
| You Will Need: | How To: |
|
• Stick on cork tiles • Coloured tape • Photo ledges or shelves • Hanging rail |
1. First, mount the magazine files vertically to the wall using the mounting squares. 2. Then, create storage labels with the sticky labels that read ‘Pending’, ‘Do Later’ and ‘Do Now. Stick each of these to one of the magazine files to stay up to date on deadlines. |
11. Desktop Organiser
Keeping your desk uncluttered and ready to go for the next morning is vital to a productive start, and this D.I.Y desktop organiser is the perfect solution. With plenty of space to slip papers and letters out of the way as well as several tiers to keep everything separate and in the right place, you can put some cereal boxes to good use in your office with this quick, budget-friendly activity.

| You Will Need: | How To: |
|
• 4 cereal boxes • Craft glue • Photo ledges or shelves • Hanging rail |
1. First, glue the four cereal boxes together in a tower. Reinforce the structure by wrapping tape around the glued-together cereal boxes. 2. Then, wrap the outside of the boxes with decorative wrapping paper. |
Kitchen
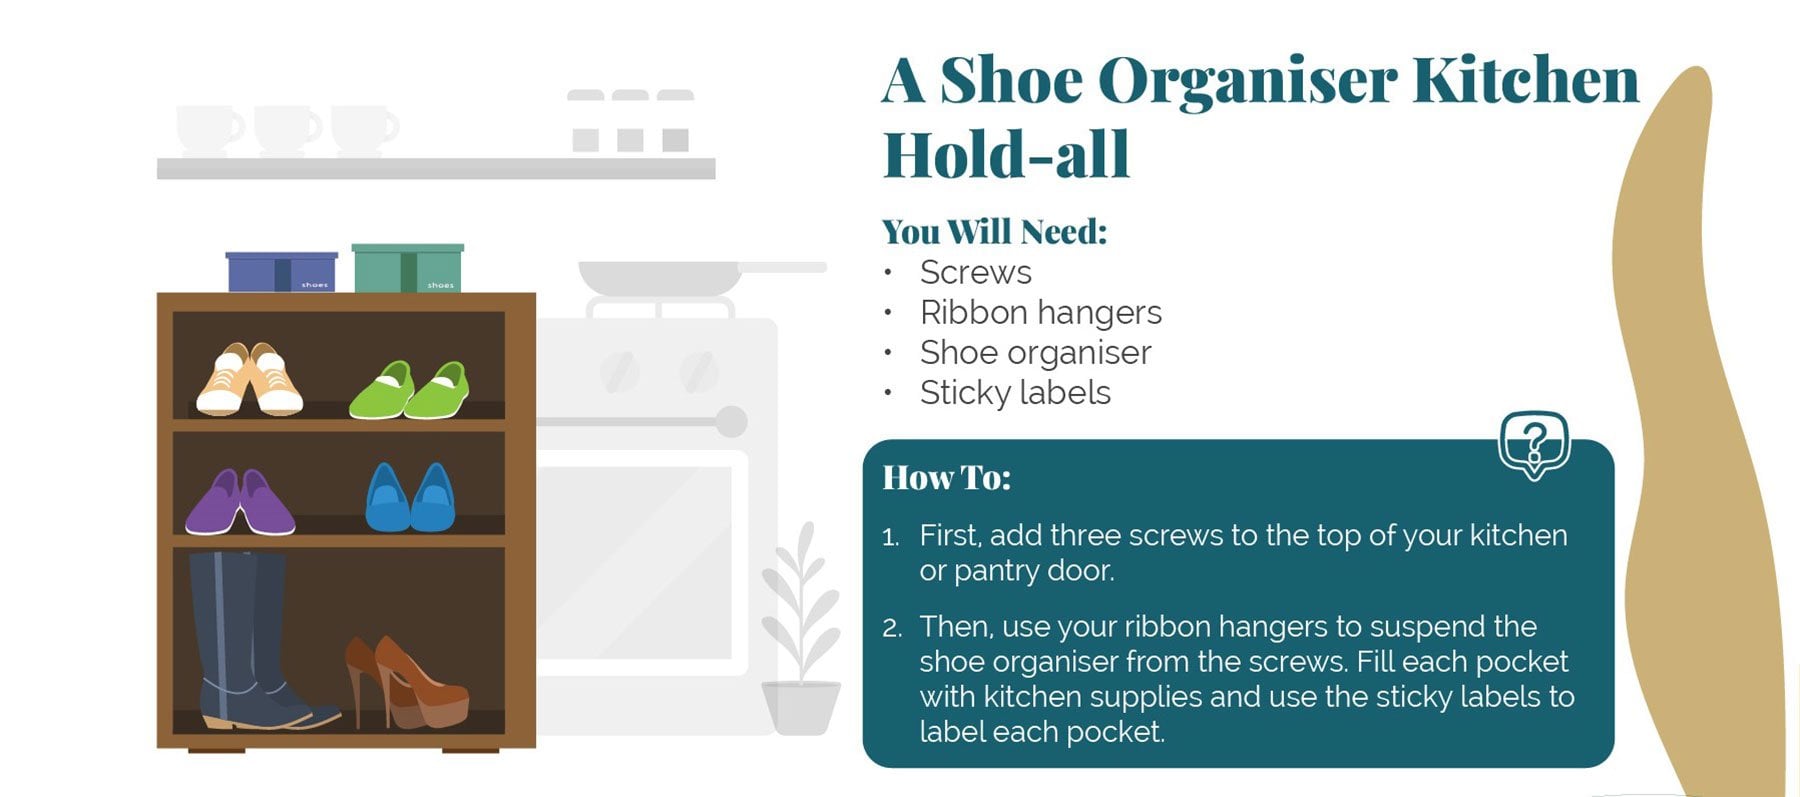
12. A Shoe Organiser Kitchen Hold-all
A shoe organiser is the perfect storage solution all on its own, but, of course, you don’t have to limit its use to shoes. This easy, two step guide tells you how to hang a shoe organiser to put to good use in the kitchen. Keep your utensils, cooking equipment, cleaning supplies or even bags and tubs of spices in this kitchen hold-all for safe-keeping.
| You Will Need: | How To: |
|
• Screws • Ribbon hangers • Shoe organiser • Sticky labels |
1. First, add three screws to the top of your kitchen or pantry door. 2. Then, use your ribbon hangers to suspend the shoe organiser from the screws. Fill each pocket with kitchen supplies and use the sticky labels to label each pocket. |
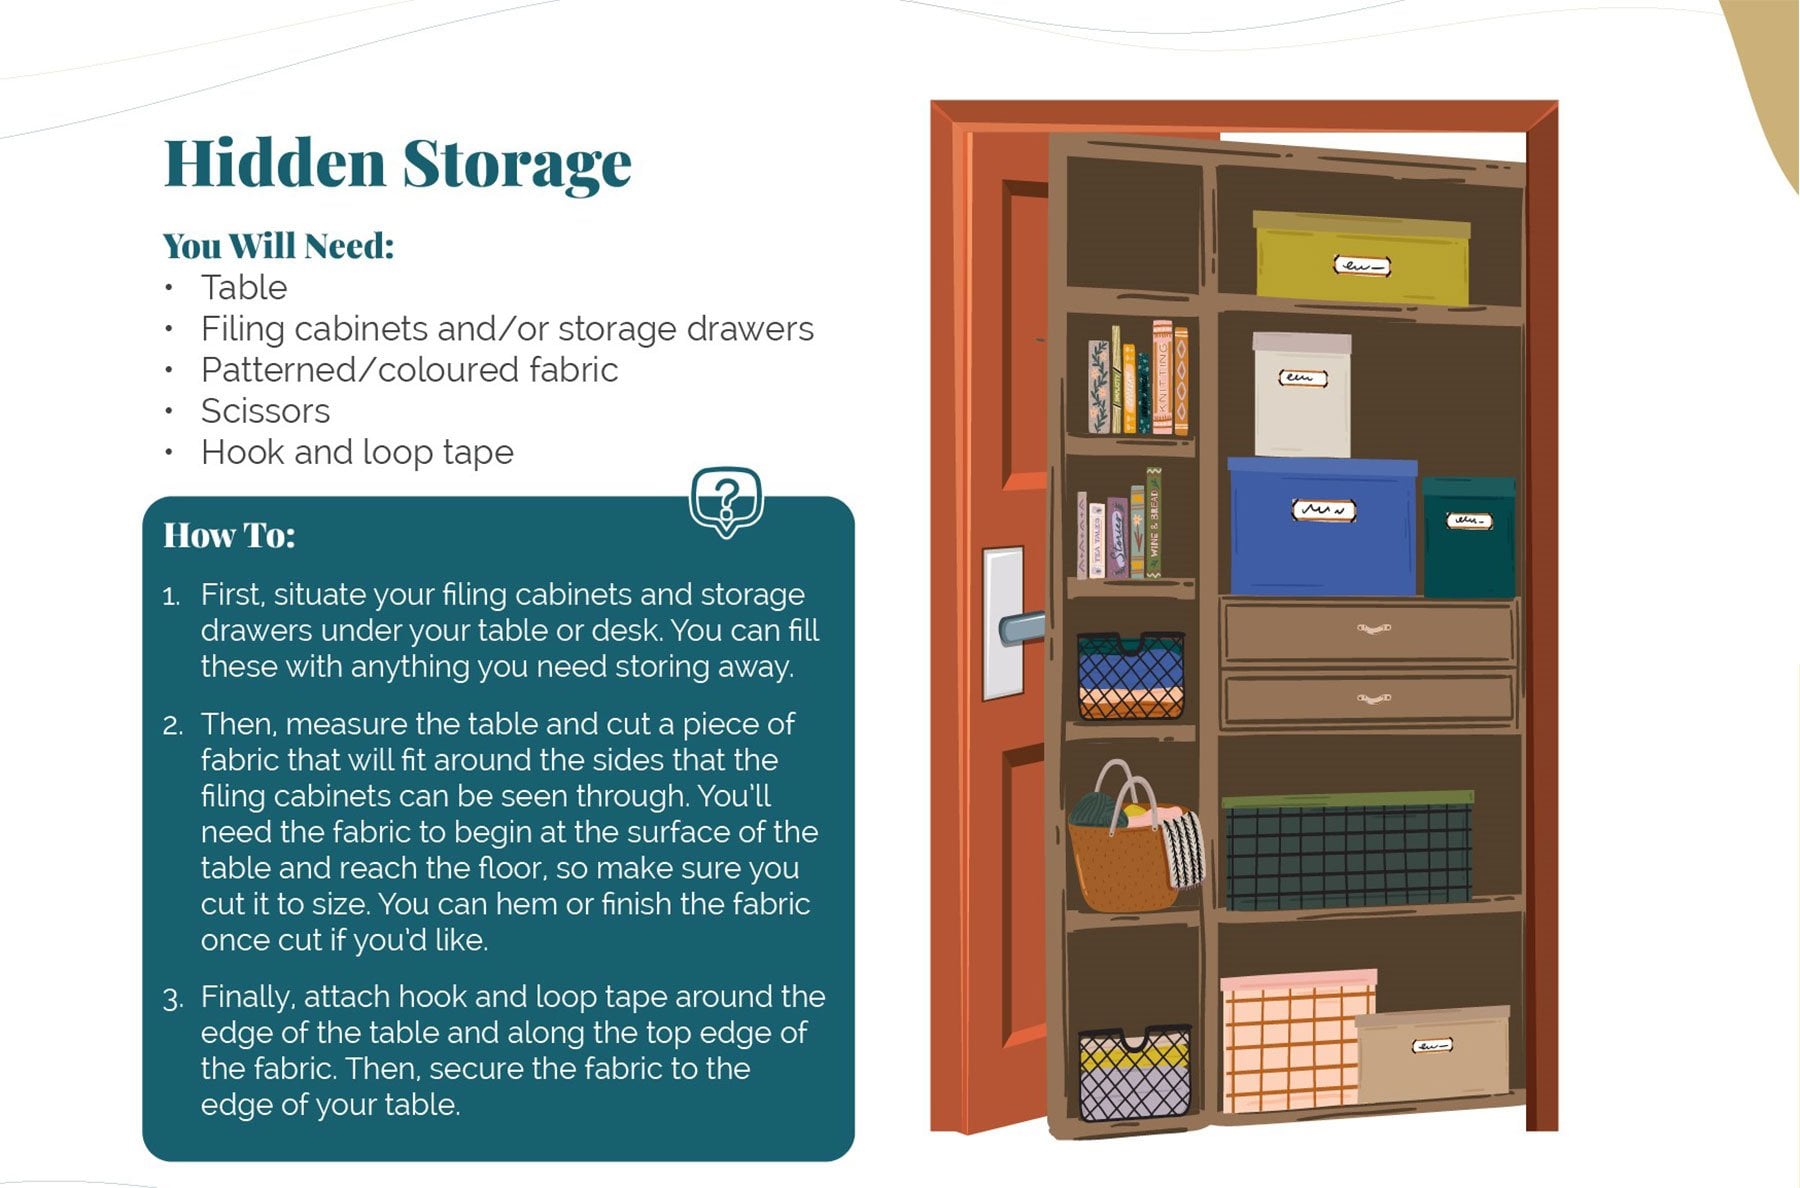
13. Hidden Storage
It’s unfortunate, but storage solutions like filing cabinets and drawers can often look clunky and out of place, cluttering up the room and getting in the way. Banish this annoyance with this hidden storage solution. All you need is a table tall enough to hide the storage equipment and a piece of fabric to create a beautiful skirt that adds a cohesive touch to the room.
| You Will Need: | How To: |
|
• Table • Filing cabinets and/or storage drawers • Patterned/coloured fabric • Scissors • Hook and loop tape |
1. First, add three screws to the top of your kitchen or pantry door. 2. Then, use your ribbon hangers to suspend the shoe organiser from the screws. Fill each pocket with kitchen supplies and use the sticky labels to label each pocket. |
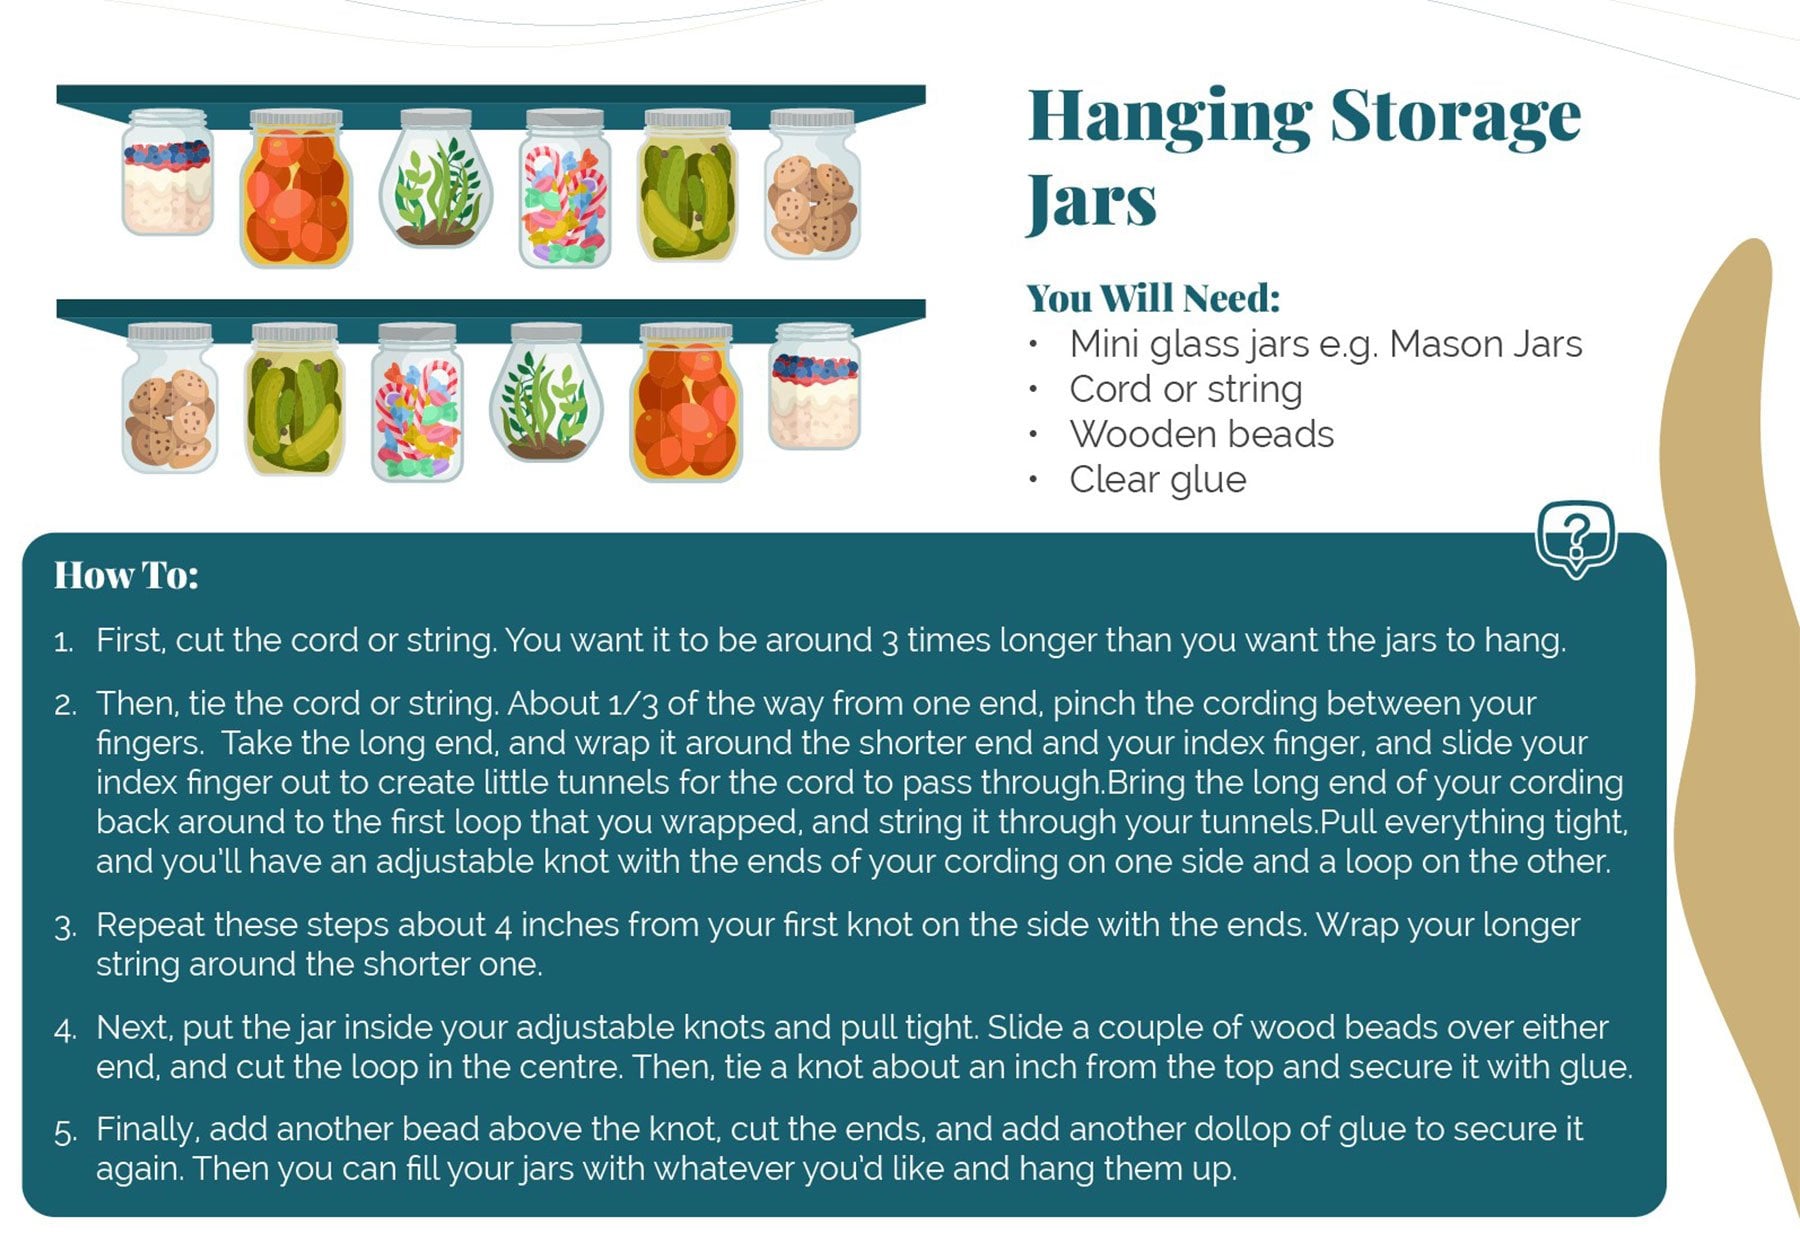
14. Hanging Storage Jars
Many of us have Mason jars hanging around - they’re a stylish drinking glass, if nothing else! But you can put them to constant use with this hanging storage jar D.I.Y activity. Perfect for the kitchen, these hanging storage jars can be the new home for plants, utensils, spices, herbs, common ingredients, or even just general clutter around the kitchen.
| You Will Need: | How To: |
|
• Mini glass jars e.g. Mason Jars • Cord or string • Wooden beads • Clear glue |
1. First, cut the cord or string. You want it to be around 3 times longer than you want the jars to hang. 2. Then, tie the cord or string. About 1/3 of the way from one end, pinch the cording between your fingers. Take the long end, and wrap it around the shorter end and your index finger, and slide your index finger out to create little tunnels for the cord to pass through. Bring the long end of your cording back around to the first loop that you wrapped, and string it through your tunnels. Pull everything tight, and you’ll have an adjustable knot with the ends of your cording on one side and a loop on the other. 3. Repeat these steps about 4 inches from your first knot on the side with the ends. Wrap your longer string around the shorter one. 4. Next, put the jar inside your adjustable knots and pull tight. Slide a couple of wood beads over either end, and cut the loop in the centre. Then, tie a knot about an inch from the top and secure it with glue. 5. Finally, add another bead above the knot, cut the ends, and add another dollop of glue to secure it again. Then you can fill your jars with whatever you’d like and hang them up. |
Dining Room
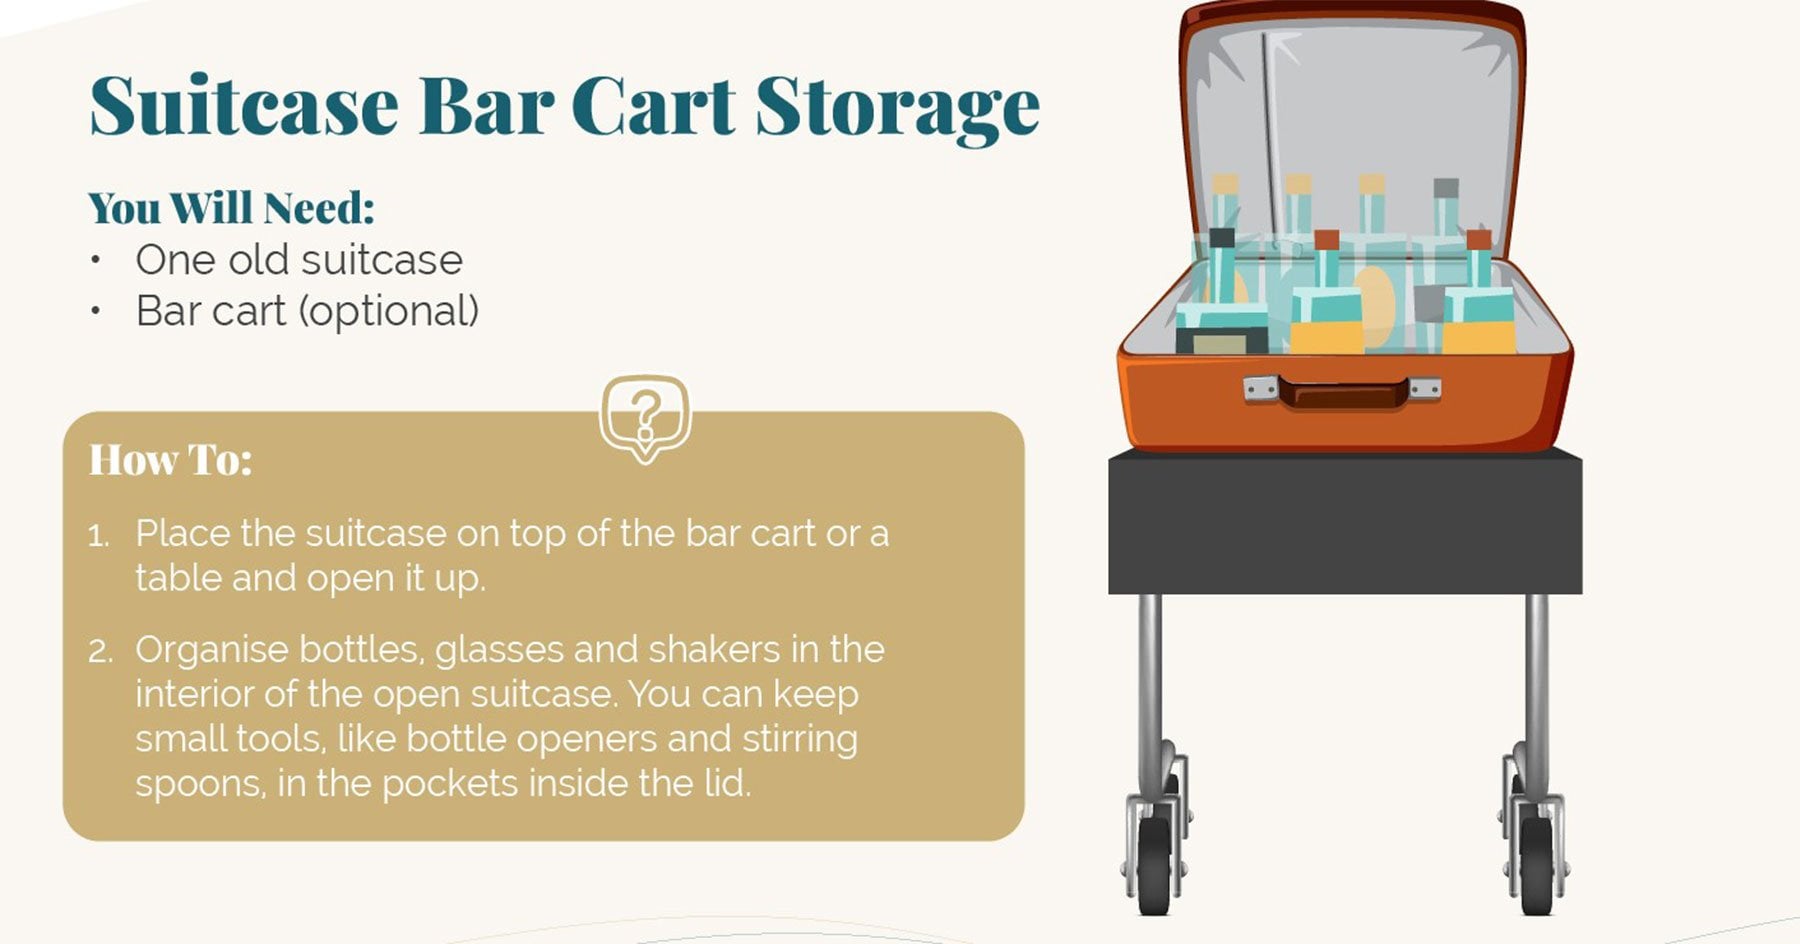
15. Suitcase Bar Cart Storage
It’s easy to hang on to old suitcases as a backup or a just in case, but you can put them to permanent use in an undoubtedly stylish way with this suitcase bar cart storage. Simple and classy, you don’t even need a bar cart to create this project! Just a simple suitcase and several bottles that need putting away and you have the ideal bottle storage.
| You Will Need: | How To: |
|
• One old suitcase • Bar cart (optional) |
1. Place the suitcase on top of the bar cart or a table and open it up. 2. Organise bottles, glasses and shakers in the interior of the open suitcase. You can keep small tools, like bottle openers and stirring spoons, in the pockets inside the lid. |
16. D.I.Y Kitchen Utensil Organiser
Keep your utensils in order with this easy D.I.Y organiser. With a bit of wood board and a few small hooks, you can put together a simple utensil organiser that fits perfectly on the inside of a pantry or cupboard door.

| You Will Need: | How To: |
|
• Wood board • Measuring tape • Saw • Small hooks • Sticky pads |
1. Start by measuring the inside of the cupboard door on which you want to hang your organiser and cut your wood board to size so it is slightly smaller than the cupboard door. 2. Then, mount the small hooks on your wood board between 2 - 5 cm apart so they have enough room to hold your utensils. 3. Finally, secure the wood board to the inside of the cupboard door using sticky pads. |
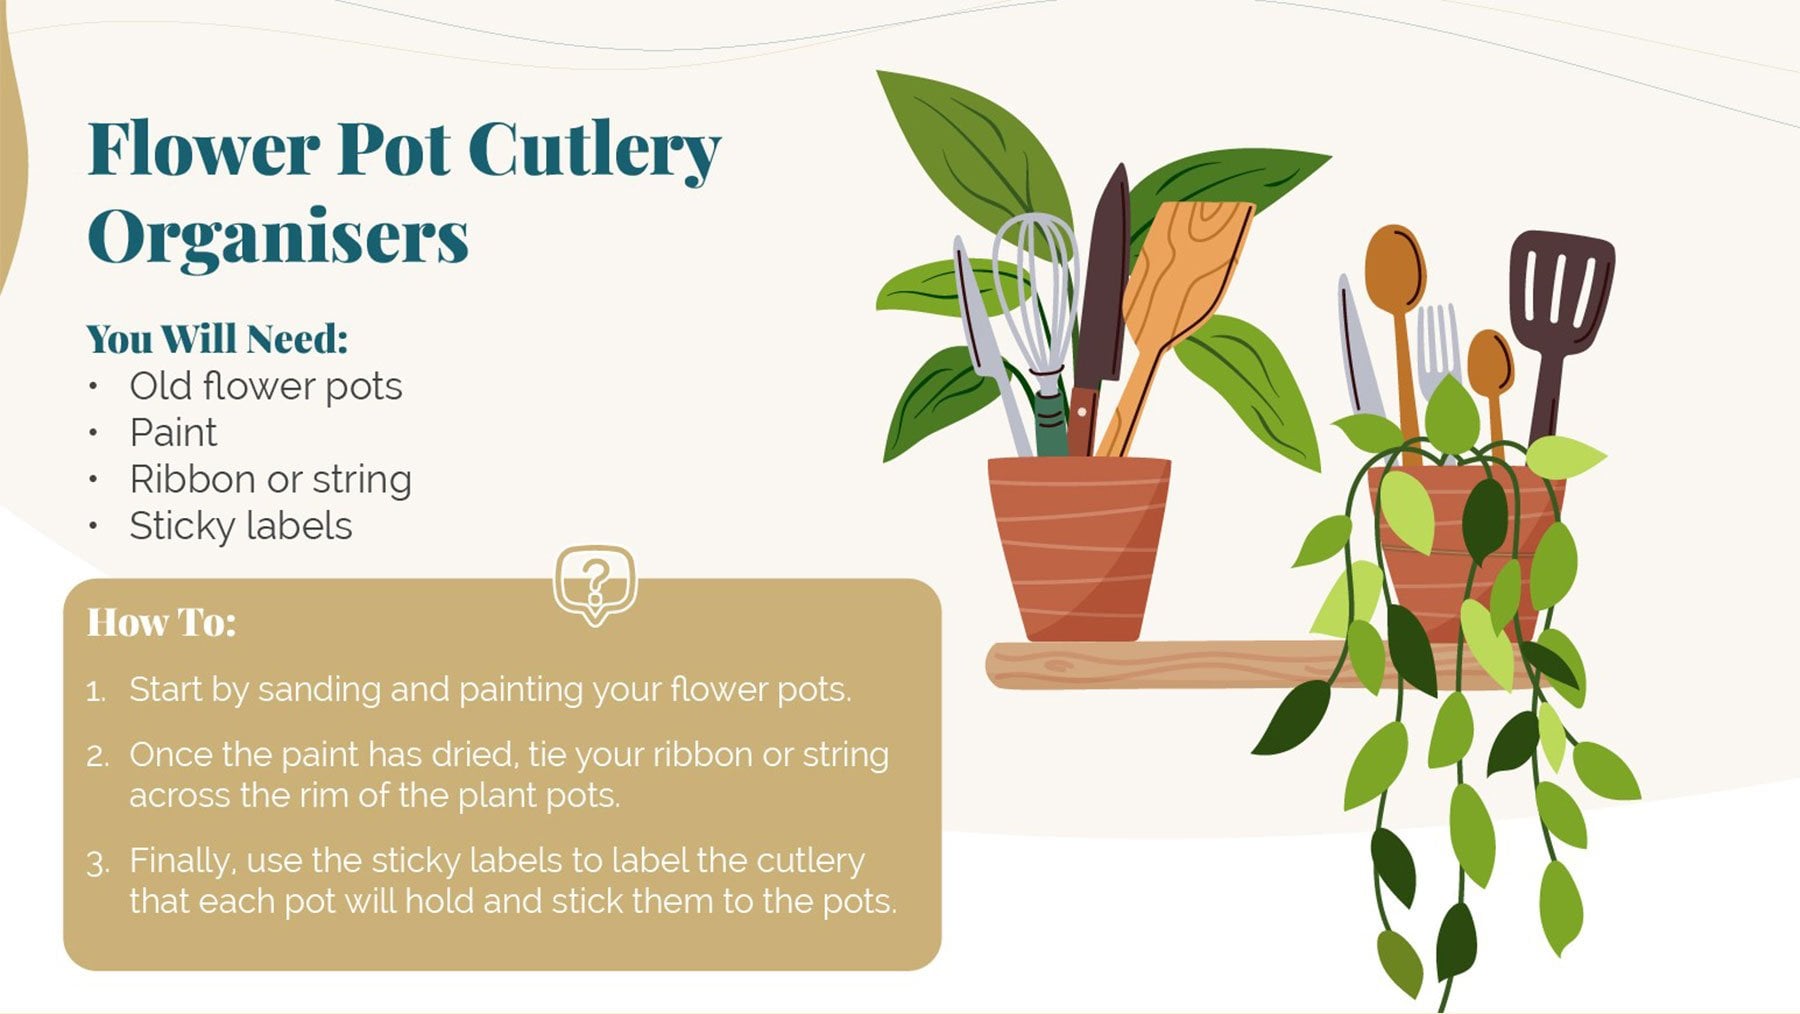
17. Flower Pot Cutlery Organisers
Bring a touch of rustic to your dining room with these classy flower pot cutlery organisers. Incredibly simple to put together and perfectly customisable to your decor, these flower pot cutlery organisers are a fantastic way to keep everything together in style.
| You Will Need: | How To: |
|
• Old flower pots • Paint • Ribbon or string • Sticky labels |
1. Start by sanding and painting your flower pots. 2. Once the paint has dried, tie your ribbon or string across the rim of the plant pots. 3. Finally, use the sticky labels to label the cutlery that each pot will hold and stick them to the pots. |
Bathroom
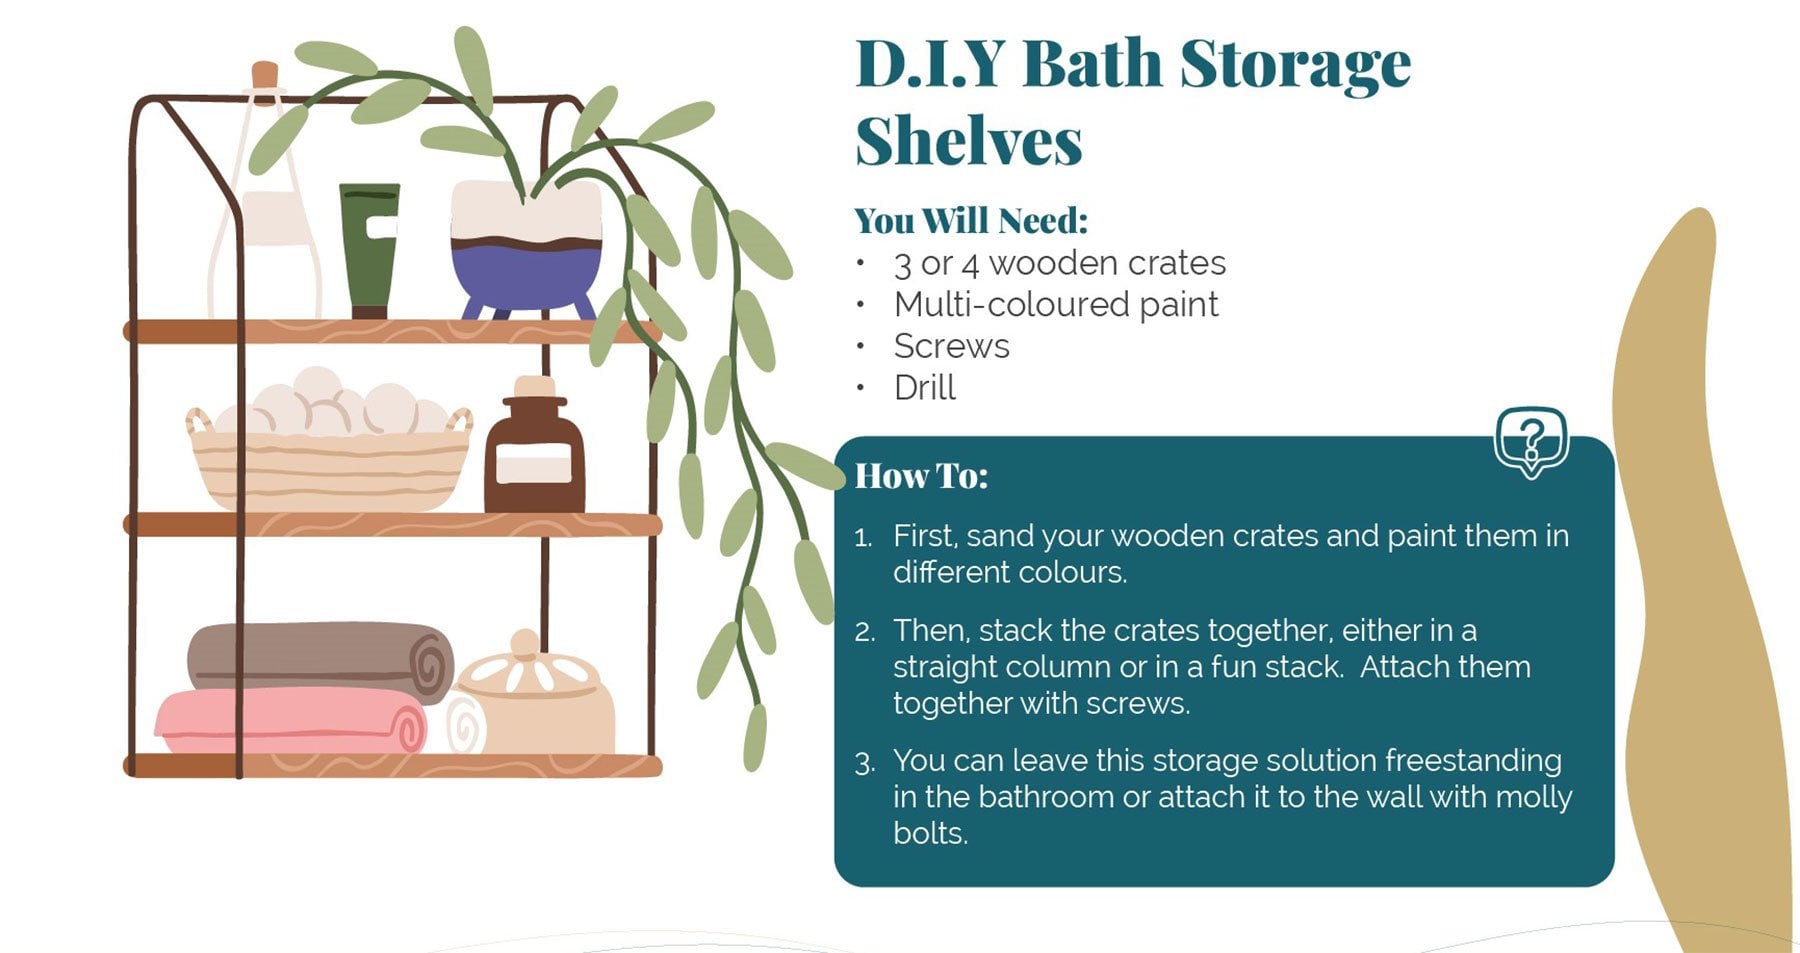
18. D.I.Y Bath Storage Shelves
You can keep your bathroom clean and tidy for less with these easy D.I.Y bath storage shelves. With a few wooden crates and a bit of D.I.Y skill, you can put together a fun set of storage shelves that express your personality through a fun design and wonderful complementary colours.
| You Will Need: | How To: |
|
• 3 or 4 wooden crates • Multi-coloured paint • Screws • Drill |
1. First, sand your wooden crates and paint them in different colours. 2. Then, stack the crates together, either in a straight column or in a fun stack. Attach them together with screws. 3. You can leave this storage solution freestanding in the bathroom or attach it to the wall with molly bolts. |
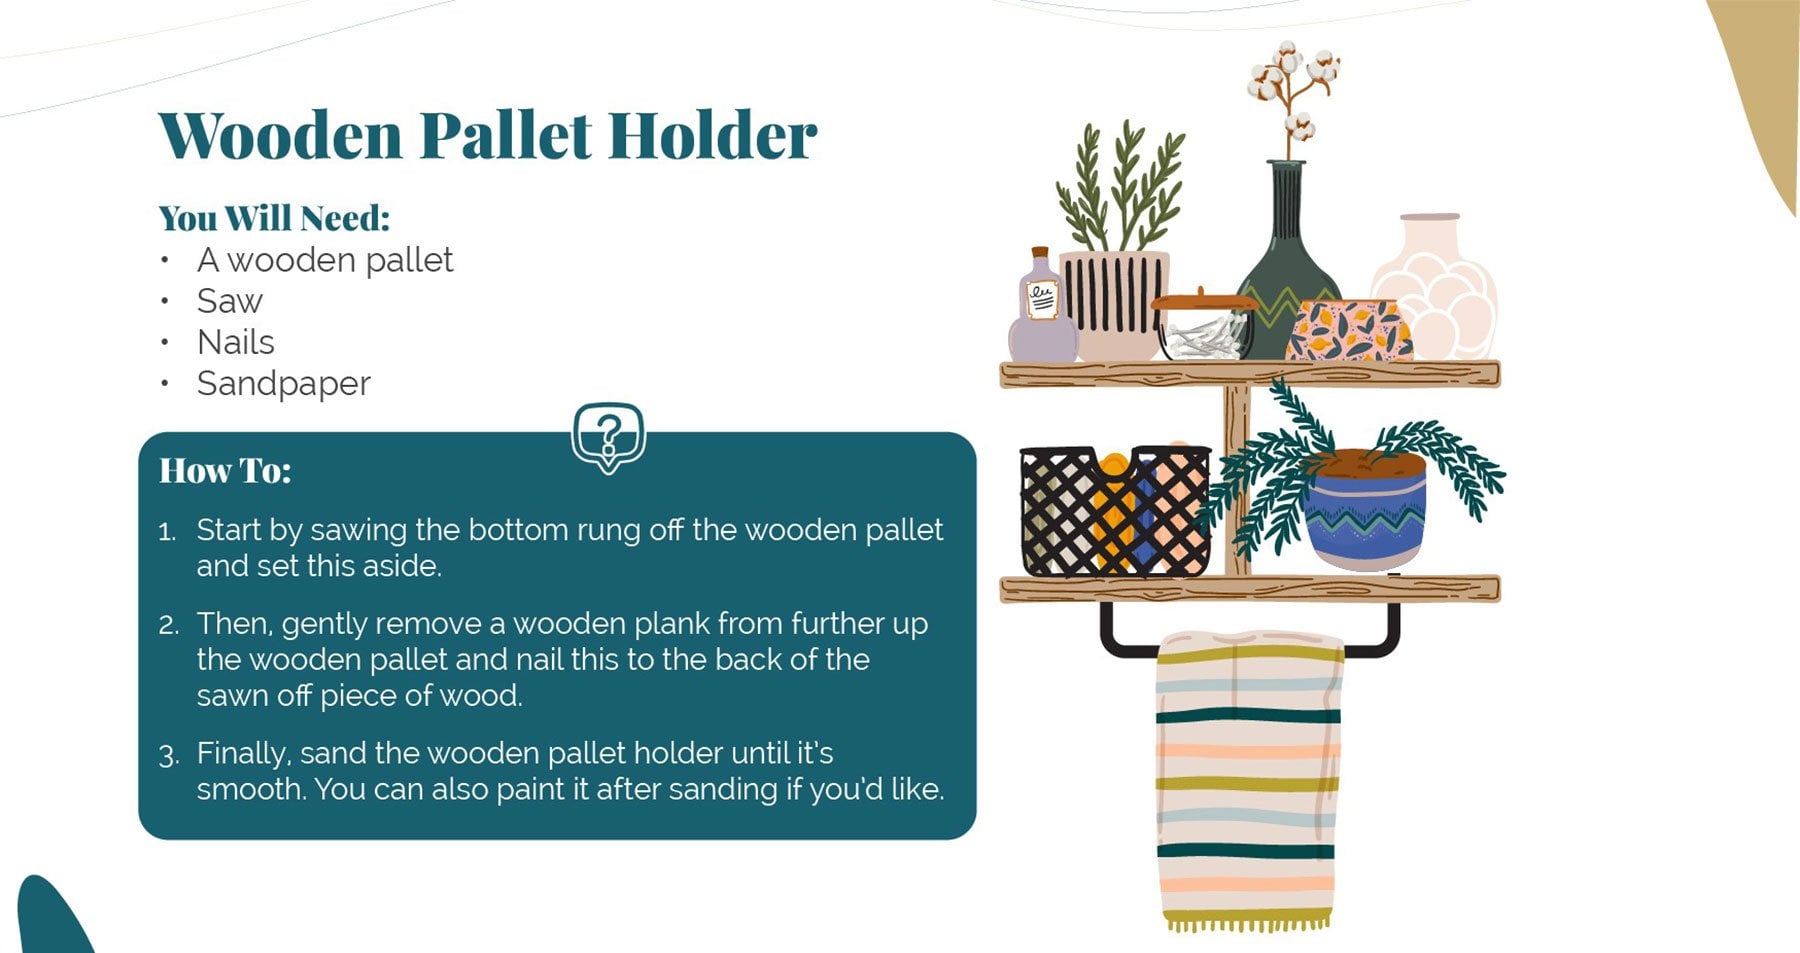
19. Wooden Pallet Holder
This wooden pallet holder is a no fuss solution to bottles and tubs strewn across the bathroom, and gives you the ideal place to keep everything in one place. You can invest in a brand new wooden pallet or repurpose an old one for this easy D.I.Y project, although you’ll have to be prepared to sand and prepare an older wooden pallet for this purpose.
| You Will Need: | How To: |
|
• A wooden pallet • Saw • Nails • Sandpaper |
1. Start by sawing the bottom rung off the wooden pallet and set this aside. 2. Then, gently remove a wooden plank from further up the wooden pallet and nail this to the back of the sawn-off piece of wood. 3. Finally, sand the wooden pallet holder until it’s smooth. You can also paint it after sanding if you’d like. |
Entryway
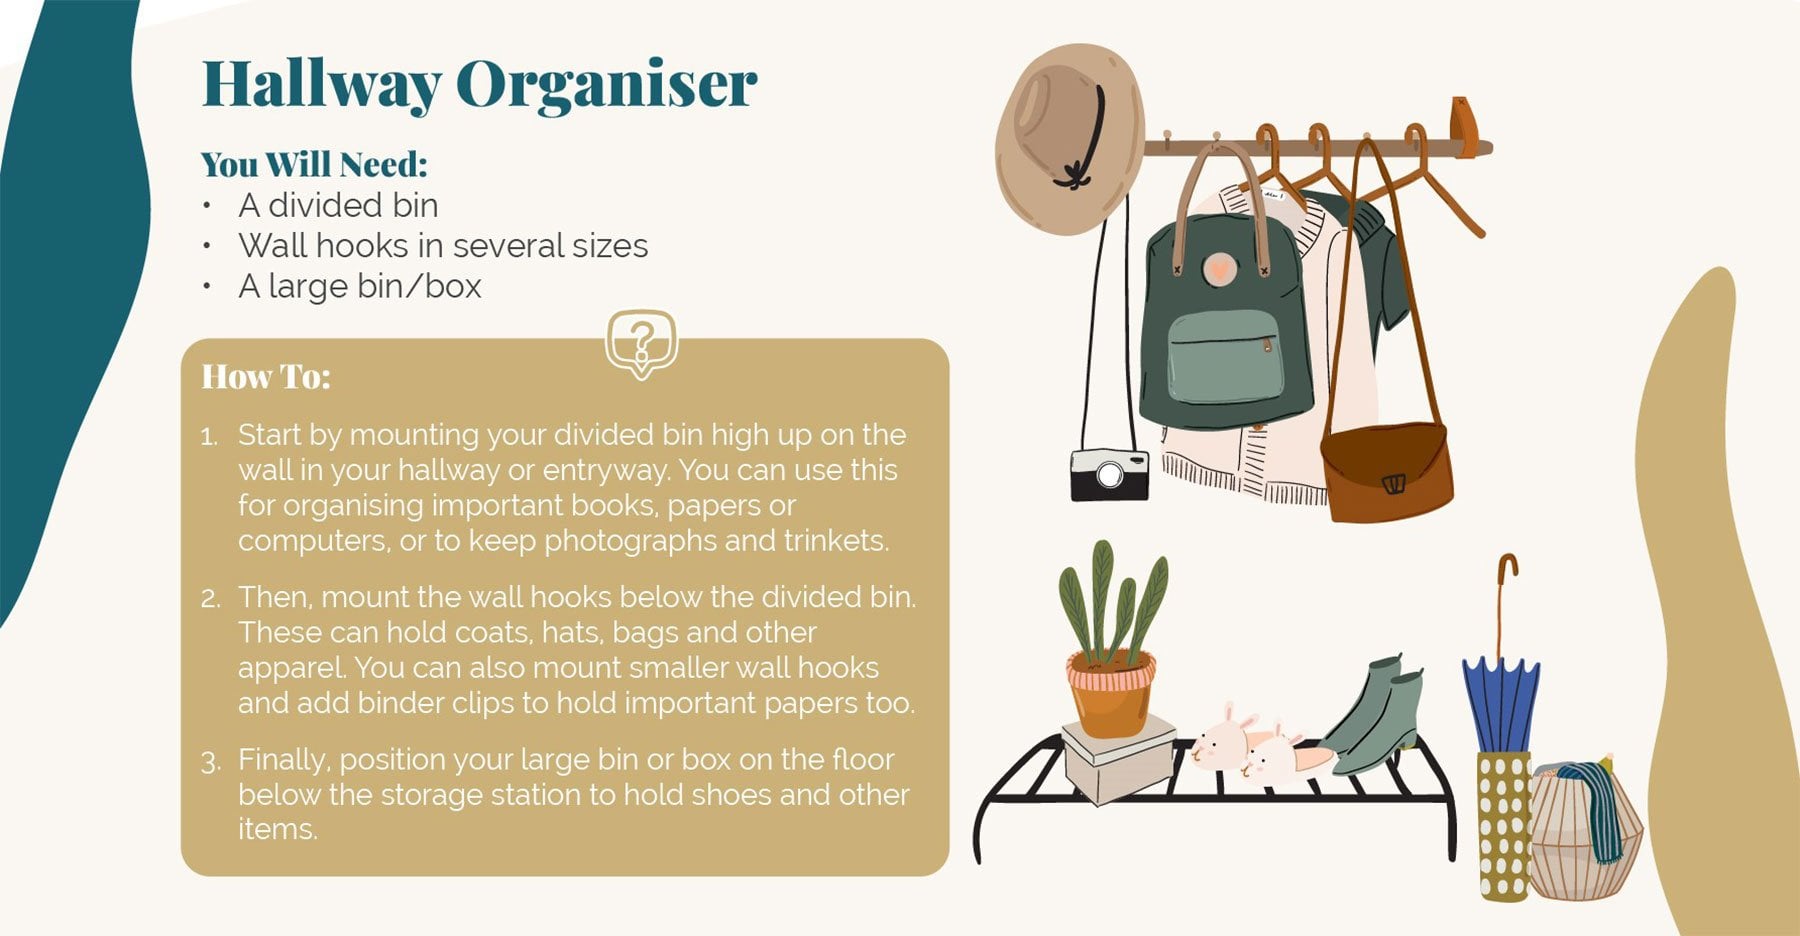
20. Hallway Organiser
This hallway organiser is the best place to keep all the essentials for school and work within easy reach on a busy morning, and is just as simple to use on the way back in after a long day. With space to hold everything from photographs, books and computers to bags, coats and shoes, this D.I.Y hall organiser is the answer to keeping your hallway decluttered.
View our range of modern coat stands for extra storage in your hallway.
| You Will Need: | How To: |
|
• A divided bin • Wall hooks in several sizes • A large bin/box |
1. Start by mounting your divided bin high up on the wall in your hallway or entryway. You can use this for organising important books, papers or computers, or to keep photographs and trinkets. 2. Then, mount the wall hooks below the divided bin. These can hold coats, hats, bags and other apparel. You can also mount smaller wall hooks and add binder clips to hold important papers too. 3. Finally, position your large bin or box on the floor below the storage station to hold shoes and other items. |
Device Charging Station
You can keep all those devices tidy, together and ready to go with this simple device charging station. Although we’ve put it in our easy D.I.Y projects for the entryway, you can set up this device charging station in any room of the house that you think would be most beneficial. As long as you have enough space to hold all the necessary devices, you can create this easy charging station anywhere.

| You Will Need: | How To: |
|
• Enough trays for each member of the household • Binder clips • Devices |
1. Choose a central location to set up your charging station that has plenty of outlets or the space for a power strip. 2. Then, find a place for your trays, such as on a table or a dresser. Designate a tray to each member of the household and add a binder clip to one edge of each one. 3. Finally, plug your device chargers in and thread the wires through the binder clips to keep them in place. You can also use these trays to keep keys, wallets and other belongings and trinkets while your devices charge. |
22. Shoe Storage Station
Banish the annoyance of scattered shoes across the entryway and hall with this D.I.Y shoe storage station. Easy to put together with an old shelving unit, preferably one with wheels, and some clear containers, you can keep shoes for all occasions safe and labelled to easily find when you’re ready to rush out of the door.

| You Will Need: | How To: |
|
• Clear containers • Old shelving unit with wheels • Sticky labels • Paint (optional) |
1. If you’d like, before putting the shoe shelving unit together, you can repurpose your old shelving unit by sanding and repainting it. 2. Then, you can put your unit together. Put pairs of shoes in clear containers and place them on the shelves. 3. Finally, label the containers with their contents. You can swap your shoes (or whatever belongings you are storing) according to the season. |
Read More: Space-Saving Hall, Stair and Landing Ideas
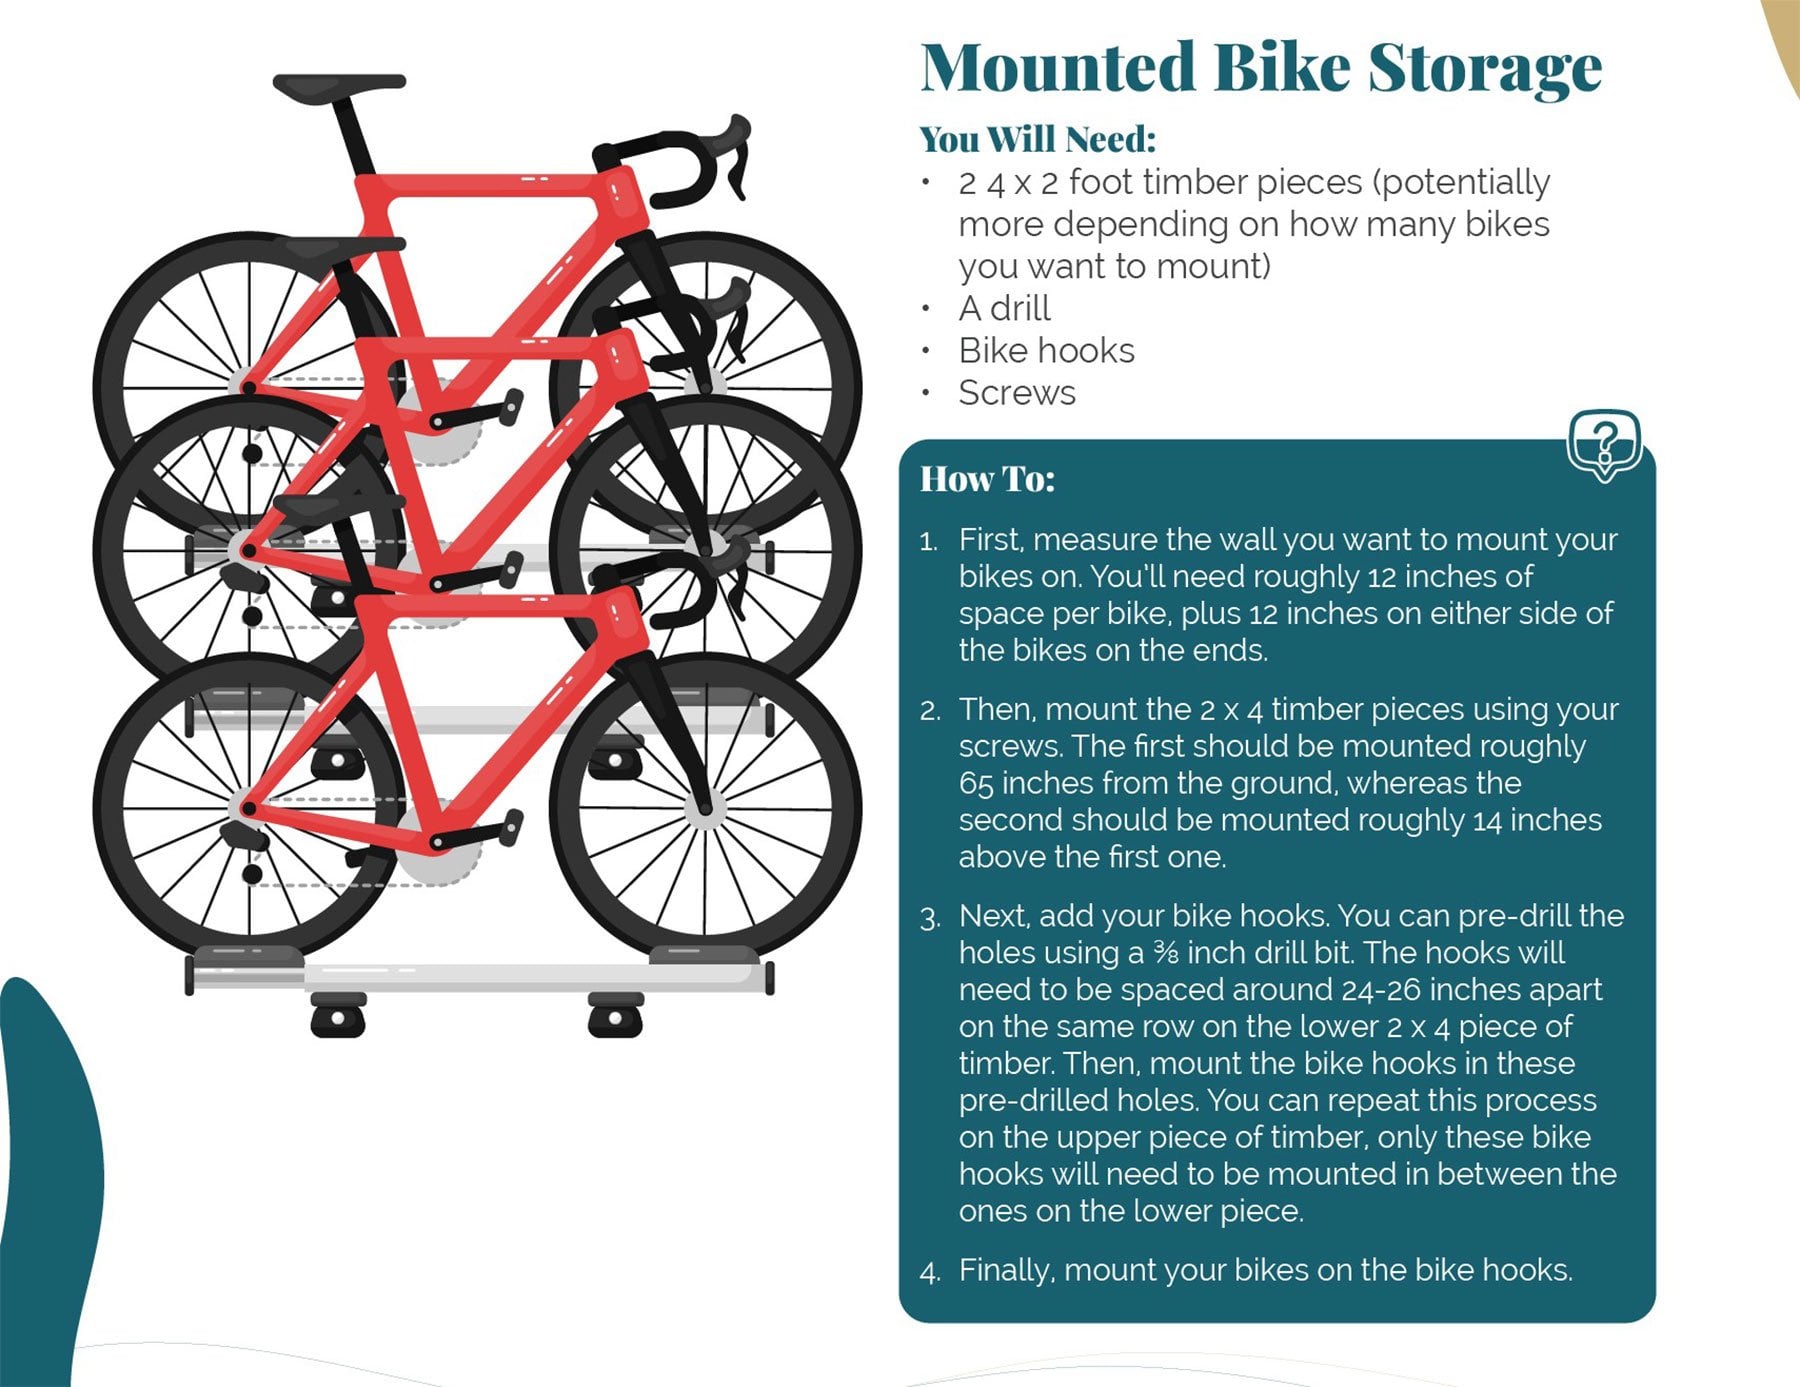
23. Mounted Bike Storage
The garage is the ideal place to keep your bikes, yet even so they take up quite a lot of room. But, you can free up this space for even more storage with this D.I.Y mounted bike solution. This project requires the most skill of all our DIY storage ideas on this list, but with the right measurements and a steady hand you will get through it without much trouble.
| You Will Need: | How To: |
|
• 2 4 x 2 foot timber pieces (potentially more depending on how many bikes you want to mount) • A drill • Bike hooks • Screws |
1. First, measure the wall you want to mount your bikes on. You’ll need roughly 12 inches of space per bike, plus 12 inches on either side of the bikes on the ends. 2. Then, mount the 2 x 4 timber pieces using your screws. The first should be mounted roughly 65 inches from the ground, whereas the second should be mounted roughly 14 inches above the first one. 3. Next, add your bike hooks. You can pre-drill the holes using a ⅜ inch drill bit. The hooks will need to be spaced around 24-26 inches apart on the same row on the lower 2 x 4 piece of timber. Then, mount the bike hooks in these pre-drilled holes. You can repeat this process on the upper piece of timber, only these bike hooks will need to be mounted in between the ones on the lower piece. 4. Finally, mount your bikes on the bike hooks. |
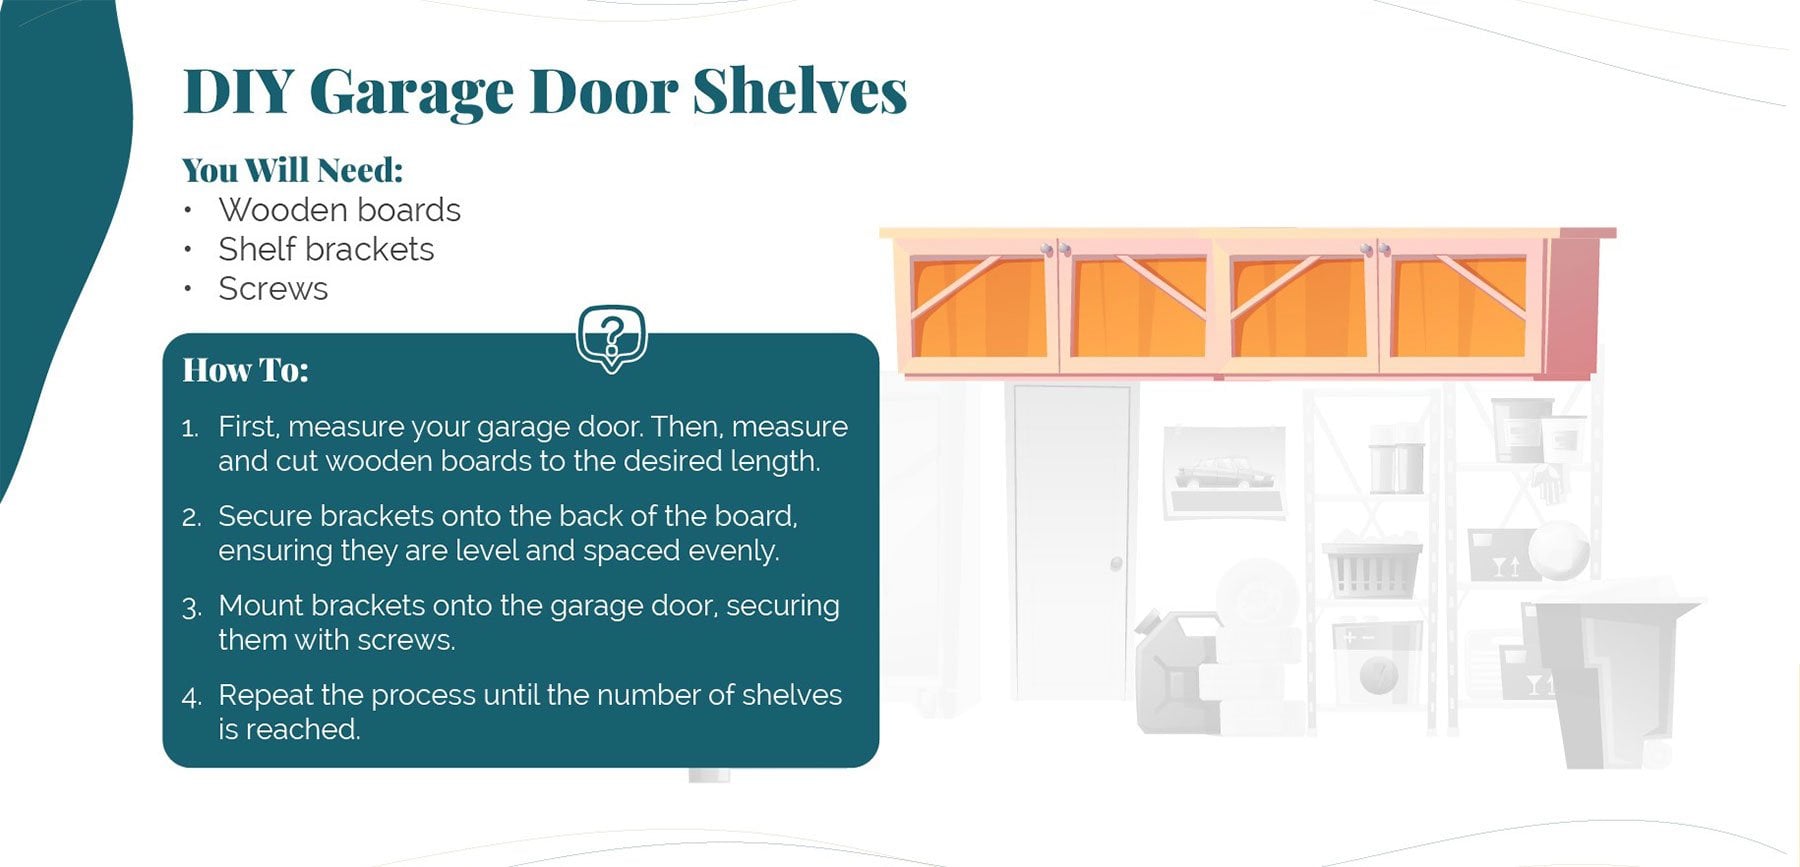
24. D.I.Y. Garage Door Shelves
Even the doors in your garage can provide an extra space for storage, and these easy shelves are the best solution. Easily measurable to fit any size of garage door, you can create shelves of any size to hold as much or as little as is necessary in your garage. However, make sure you are precise with your measurements - you don’t want to jam or harm your garage doors!
| You Will Need: | How To: |
|
• Wooden boards • Shelf brackets • Screws |
1. First, measure your garage door. Then, measure and cut wooden boards to the desired length. 2. Secure brackets onto the back of the board, ensuring they are level and spaced evenly. 3. Mount brackets onto the garage door, securing them with screws. 4. Repeat the process until the number of shelves is reached. |
25. Tin Can Storage
Tin cans may not be the most appealing things to use in D.I.Y storage projects, but anything goes in a garage! This simple project is great for recycling used tin cans and extremely budget friendly, with only a few extra tools and equipment required, and is great for keeping things clear and uncluttered in the garage.

| You Will Need: | How To: |
|
• Empty tin cans • Sandpaper • Paints • Acrylic varnish • Drill • String |
1. Start by sawing the bottom rung off the wooden pallet and set this aside. 2. Then, gently remove a wooden plank from further up the wooden pallet and nail this to the back of the sawn-off piece of wood. 3. Finally, sand the wooden pallet holder until it’s smooth. You can also paint it after sanding if you’d like. |
Put Our D.I.Y Storage Ideas To Good Use
The cost of living crisis may be affecting the majority of households in the UK, but there are many inexpensive ways to continue to improve your life without adding to any existing worries. So, try some of our D.I.Y storage ideas to keep your home clear, tidy and stylish for less.
On the other hand, if you feel that these D.I.Y projects are not for you, you can check out our vast range of house and home storage. From stylish clothes rails to open wardrobes, our selection of affordable storage solutions will give you the space you need without breaking the bank.
Sources
- Clark. (2023). Cost of living crisis in the UK - Statistics & Facts. [Online]. Statista. Last Updated: 31 January 2023. Available at: https://www.statista.com/topics/9121/cost-of-living-crisis-uk/ [Accessed 17 February 2023].
ons.gov.uk. (2022). What actions are people taking because of the rising cost of living?. [Online]. ons.gov.uk. Last Updated: 5 August 2022. Available at: https://www.ons.gov.uk/peoplepopulationandcommunity/personalandhouseholdfinances/expenditure/article [Accessed 17 February 2023].
DISCLAIMER: You are more than welcome to use the graphics in this article on your own website. However, if you do so, please link back to us here at The Urban Mill.
